
Icecrown Citadel Raid in WotLK Classic: A Comprehensive Strategy Guide
Welcome to our ultimate guide, your key to exploring the icy fortress known as Icecrown Citadel in World of Warcraft: Wrath of the Lich King Classic. It's a grand story of triumphs and tough challenges that will really test your skills. Located in the freezing land of Northrend, this fortress looks like a guardian, protecting the Lich King and his evil plans.
It is known that Icecrown Citadel came back to action on October 12, 2023, in Wrath of the Lich King Classic. This marked the beginning of phase four, launching the epic adventure on October 10.
But who will you fight? From the ugly Professor Putricide to the scary Lich King himself, each boss is a unique story. We're not just telling you how to beat them, we're giving you the secrets and strategy to defeat them. You'll learn their strengths, weaknesses, and the most efficient paths!
Also what's an adventure without rewards? Imagine the rewards you'll get: legendary Shadowmourne, achievements, Invincible's mount, and the honor of winning. We'll tell you about this in our guide too. So, get ready for a big journey through the freezing land and the thrill of victory. Icecrown Citadel is waiting, and you're destined for a heroic adventure!
However, even with all the tough challenges and different difficulty levels, you have another option - you can buy our fast WotLK Classic Icecrown Citadel Raid Boost. Everything will become much simpler, and the rewards - closer.

WotLK Classic Icecrown Citadel Raid Boost
What Exactly is Icecrown Citadel Raid in WotLK Classic?
To explore the frozen world of Northrend and enter Icecrown Citadel, an Legendary Raid in Wrath of the Lich King of World of Warcraft. This massive ice fortress is a central part of the expansion's story and calls upon heroes to face a great darkness. Which is familiar to so many.
So, Icecrown Citadel has two modes:
- 10-player mode for a few brave souls.
- 25-player mode for a big group.
Divided into sections, each with its own bosses and themes, this endgame adventure features 12 tough bosses, each requiring skill, strategy, and especially teamwork.
In this raid, the central figures are our courageous heroes at Level 80. The performance is adaptable, catering to various group sizes and levels of courage. You can begin with the Normal Mode to get a glimpse of the storyline, or you can opt for the more challenging Heroic Mode. The choice is yours, but once you initiate, you're dedicated for the week and this battle.
And unlike the original expansion, trying to tackle Icecrown Citadel alone is not an option in WotLK Classic. Gather your group of brave friends, for this journey needs unity, brave and cooperation!
In this guide, we'll uncover the secrets of Icecrown Citadel:
- Key Figures in the Citadel: Meet key vendors and characters in the citadel, each playing a role in your adventure.
- Gaining Reputation: Figure out the mysteries of Ashen Verdict Reputation, an important part of your journey.
- Getting Around the Citadel: Discover key spots in the citadel for an accurate approach.
- Different Paths and Lockout Info: Explore the raid versions (Heroic and Normal) and understand how the lockout system works, so you can plan your raids effectively.
- Boss Stories: Explore boss strategies in Icecrown Citadel, understanding their mechanics, strengths, and weaknesses.
- Shadowmourne Quest: Engage in the exciting Shadowmourne Questline, in the middle of this icy castle is a super powerful and famous weapon called Shadowmourne.
- Mounts: Learn about the amazing mounts you can earn, a sign of your victories.
Sharpen your weapons, aim true, and let the hero inside you break the icy hold of the Lich King!
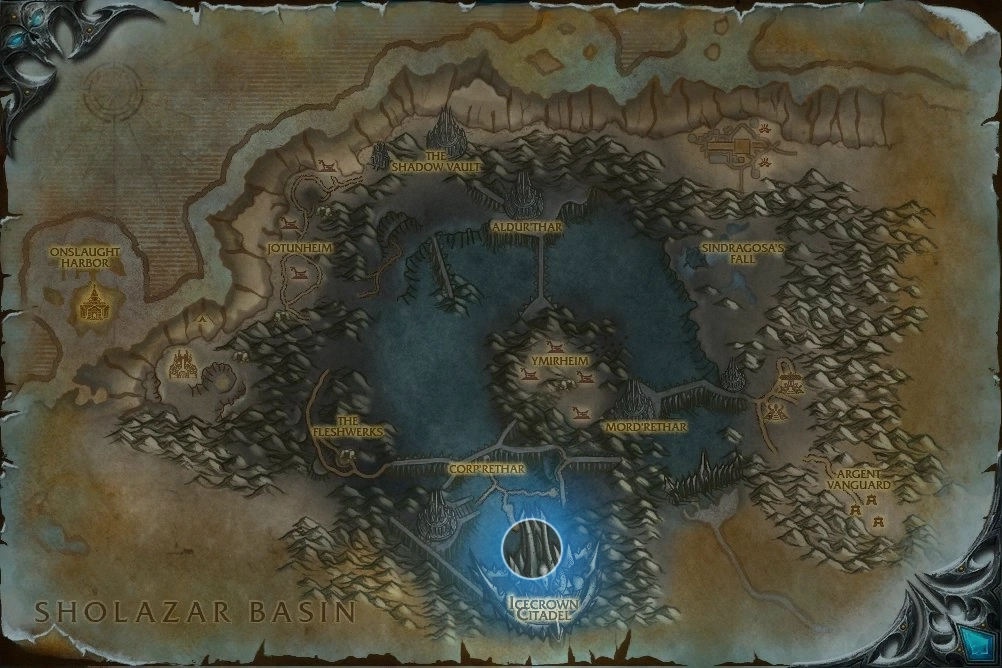
Discovering the Frozen Monolith: Navigating to Locate the Icecrown Citadel
Get set to explore the icy lands of Northrend and find your way to the mighty Icecrown Citadel! This massive frozen structure is in the south of Northrend, ruling over the Icecrown area. To kick off your journey, head near Wintergrasp Fortress, and you'll find a good starting spot. Adventurers can hop on a flight path from there to get to the Wintergrasp.
But hey, watch out! It's smart to avoid traveling during battles to steer clear of accidental trips to Dalaran. We all know how annoying teleporting to the wrong place can be!
If you like a more solo flying adventure, take off from Dalaran. Head west during your flight, and you'll arrive at the Citadel's intimidating gates. Get your gear ready and team up with your pals because an exciting and bone-chilling adventure is waiting behind those icy walls!
Behind the Frosty Curtain: NPC’s in Icecrown Citadel
As you step into the icy world of Icecrown Citadel, it's not just a cold, frozen place. Behind the scenes, there are important characters and traders that add depth to this frozen adventure.
Highlord Darion Mograine: The Puppet Master
Highlord Darion Mograine is a big deal in this adventure. He's a key player in the Ashen Verdict's story. Becoming friendly with this mysterious group starts your journey with a quest called The Sacred and the Corrupt. This is just the beginning of getting the legendary Shadowmourne. It's a story of shadows and tough choices.
Alchemist Finklestein: The Potion Expert
Think of Alchemist Finklestein as a potion creator. He's the guy from Ashen Verdict who can give you hope in a bottle. Visit him to get elixirs that might really help you.
Goodman the Closer: The Cold Merchant
Goodman, also known as The Closer, is the Emblem of Frost trader. He's the guy you can buy powerful stuff from in the Citadel. Trade your hard-earned emblems for some cool items. It's like going on a shopping spree!
Navigating the Ashen Verdict: A Reputation Farming Guide
Step into the majestic halls of Icecrown Citadel, a frozen fortress where you'll encounter a significant faction called The Ashen Verdict. When you reach the gates of Icecrown Citadel, the path to becoming their top ally unfolds, promising amazing rewards and recognition. Led by Tirion Fordring and Darion Mograine, this faction represents hope in the icy wastelands.
Reaching the highest level of friendship with the Ashen Verdict it's like a big story. As you climb up, you'll earn achievements like "The Ashen Verdict" and an awesome title "of the Ashen Verdict."
Now, you might ask, how can one gain favor with The Ashen Verdict? The answer is battle! Engage and defeat the creatures of Icecrown Citadel, from tough bosses to even the toughest mobs. Each victory brings you closer to gaining their recognition.
Usually, factions provide special badges to help build your reputation, but the Ashen Verdict does things differently. Instead of wearing a badge, you'll follow a unique path to win their favor.
In this grand journey, bosses grant a generous 250 reputation, while the Lich King, the epitome of this icy realm, offers a whopping 1500 reputation. Even the persistent trash mobs contribute 50 reputation for your bravery. But how can you efficiently farm reputation?
You have two approaches to succeed, each with its own speed and style:
- Steady Progress: Complete weekly quests for both 10 and 25-man Icecrown Citadel, follow the steps of the Shadowmourne Questline, and consistently clear 10 and 25-man ICC every week. It's a regular pace, ideal for those enjoying the adventure.
- Fast Sprint: Picture a bolt of lightning—quick and intense. Gather a strong group, full of powerful heroes. Charge through the enemies in Icecrown Citadel, relentless and strong. Leave, reset, and repeat. The bosses won't be harmed, for this is a race against the clock. A precisely timed dance through the enemies, again and again, boosting your reputation. In 45-55 rounds of clearing enemies, you'll reach the highest status. A sprint, a thrilling rush towards success.
Next, we have Ormus the Penitent. He presents the Choose Your Path quest, enticing you with a ring of your preference, flaunting a remarkable item level of 251. Choose thoughtfully, for as your reputation surges, the ring's strength amplifies, reaching an astounding item level of 277 when you achieve the highest Exalted status.
As the journey continues, the rewards shine like stars on a winter night. Rings, more than just pieces of metal, are symbols of victory, waiting for you to claim.
Five special rings, each a choice, a promise of strength:
- For the Strong Defender: Ashen Band of Courage, representing incredible tanking skills. At the highest level of friendship, it turns into the Ashen Band of Endless Courage, a symbol of unyielding power.
- For the Magic Masters: Ashen Band of Destruction, a conduit of arcane mastery. Upon reaching the highest status, it transforms into the Ashen Band of Endless Destruction, a sign of arcane supremacy.
- For the Powerful Titans: Ashen Band of Might, a representation of raw strength. Once you're at the highest status, it becomes the Ashen Band of Endless Might, a sign of limitless power.
- For the Skilled Healer: Ashen Band of Wisdom, echoing celestial healing. When you reach the highest level of friendship, it becomes the Ashen Band of Endless Wisdom, a source of endless understanding.
- For the Quick Avengers: Ashen Band of Vengeance, a symbol of swift retribution. At the highest level of friendship, it changes into the Ashen Band of Endless Vengeance, a promise of never-ending payback.
With these rings, you're all set for the big adventure in Icecrown Citadel. The journey might be challenging, but it leads to greatness. The Ashen Verdict is waiting for your story.
Check our all Wrarth of the Lich king boosting services
A Complete Guide To Icecrown Citadel Raid Bosses
In the freezing halls of Icecrown Citadel, a dangerous adventure unfolds as you face a group of tough enemies. Each enemy is like a character in a story, playing a different role in this big performance.
Let's start by identifying what we're dealing with and organizing things in order. After that, we'll break down each boss and their strategies individually. Let's learn more about them:
- Lord Marrowgar: The first foe, a bony maestro commanding bone storms and breaking bones loudly.
- Lady Deathwhisper: She's the one in charge, using dark magic and controlling armies of the undead in her dark story.
- Gunship Battle: Thrilling aerial battle on Skybreaker or Orgrim's Hammer, cannons and swords clash in icy skies.
- Deathbringer Saurfang: A powerful boss covered in blood, slashing through enemies fiercely.
- Festergut: A gross boss, spreading poison and decay, a real challenge.
- Rotface: A funny yet dangerous boss, spreading diseases and playing nasty tricks.
- Professor Putricide: A clever but twisted boss, creating dangerous substances with horrible outcomes
- Blood Prince Council: A trio of vampire-like nobles, hungry for blood and causing trouble.
- Blood Queen Lana’thel: A seductive boss, using her powers and allure to capture victims.
- Valithria Dreamwalker: A fragile hope amidst the chaos, a chance to heal and recover.
- Sindragosa: A scary boss, freezing hearts and minds with icy terror.
- The Lich King: The ultimate boss, a battle that shakes the foundations of Icecrown Citadel, a fight for Azeroth's fate.
Remember, as you face these challenges, each enemy holds great rewards tokens of your victory in your adventures. From special mounts to legendary items, the rewards are as great as the battles. The Lich King is waiting.
WotLK Classic: Icecrown Citadel Bosses Strategy Guide
In this part of our guide, we won't just tell you how to beat bosses, we'll guide you through the strategies for victory and triumph. But hey, we know it won't always be easy. You might face difficulties, and that's alright. Icecrown Citadel is a place to prove yourself, and victory feels even better when you work hard for it. Learn from the strategies we provide, practice with purpose, and get ready to taste victory.
As you journey into the Citadel, you'll face 12 bosses. It's okay not to get everything perfect on your first try. By studying the strategies we provide, practicing, and learning from each attempt, a large quantity of practice will pave your way to success. Choosing the easier option can really smooth things out. Our team of skilled experts will lead you through this tough raid.
Putting together your raid team is super important. It's like forming a fellowship where each member has a crucial role. Let's find out more! Also you need just click "+" to see detailed strategy guide for each boss separately.
Get ready for a spooky encounter with Lord Marrowgar, the skeletal guardian of Icecrown Citadel's icy gates. This initial showdown in the ICC raid calls for precise moves and teamwork, setting the rhythm for the battles that follow.
The fight starts with a time to hit hard - unload your attacks on Lord Marrowgar while he's not moving. Coordinate with your team and deal as much damage as you can. This is your chance to shine!
Lord Marrowgar's Abilities:
- Bone Storm: Imagine a storm of bones. Every 2 seconds, this bone-chilling effect hurts everyone close to Marrowgar. It gets worse the closer you are and lasts for 30 seconds.
- Bone Spike Graveyard: Marrowgar hurls bone spikes from the ground, hitting unsuspecting players. This not only hurts a lot but also drains 10% of the player's health every second. It's a haunting mark of the battle.
- Coldflame: Marrowgar uses icy powers, creating a freezing line of frost that burns everyone in its path. This lasts for 8 intense seconds, making anyone it touches shiver in pain.
- Bone Slice: Marrowgar's powerful attack hits players up close hard. Tanks, especially, need to be ready for this chilling attack, as its damage can affect the whole team.
Mastering this spooky encounter sets the stage for what's to come, leading you to victory as you move deeper into Icecrown Citadel's icy grip.
Encounter with Lord Marrowgar: Strategy Guide
Get ready for the clash with Lord Marrowgar and let's plan our attack!
Phase 1: The Chill of the Grave
At the start, all tanks need to surround Lord Marrowgar to share the Bone Slice hit. Staying close to the boss is key to lessen the damage from this deadly move. Everyone in the raid, except hunters, should be up close to dodge Coldflame. Hunters, who can't shoot up close, stand slightly behind and avoid Coldflame.
Now and then, Lord Marrowgar will use Bone Spike Graveyard, nailing three targets. Melee players should focus on hitting those spikes to free their teammates. If a ranged player gets pinned, ranged damage dealers should quickly sort it out.
Transition Phase: The Bone Storm
Bone Storm is a tough phase. When a Bone Storm is about to happen, spreads out in the room. It's important to know how it works: Bone Storm usually begins with the farthest target and Coldflame shows up as it moves. Use this info to plan a smart strategy for your raid team.
Here's a good plan for your raid team setup:
- Tanks: Aim for 2-3 Tanks. Two tanks can handle the damage from Bone Slice well, but if your tanks or healers don't have strong gear, you might need a third tank for backup.
- DPS (Damage Dealers): Aim for 17-19 DPS. The enrage timer gives you some breathing space, but having more DPS helps a lot. Defeat Bone Spikes fast and end before a third or fourth Bone Storm.
- Healers: Have 4-5 healers. When Bone Storm hits, the damage to the raid goes way up. You need a good number of healers to keep everyone alive.
Adjust your plan, and conquer Lord Marrowgar. Good luck!
Prepare for the battle against Lady Deathwhisper, the mysterious leader of the Cult of the Damned. She's a tough opponent in Icecrown Citadel, using necromancy and frost spells to challenge raid groups. This fight has two main parts, each needing teamwork and good timing. You'll need to handle waves of enemies while dodging her powerful area-of-effect attacks. The heroic version of this fight makes things even tougher.
Lady Deathwhisper Abilities:
- Mana Barrier: She has a shield that regenerates her health using Mana.
- Animate Dead: She revives fallen Cult Adherents or Cult Fanatics during the battle.
- Death and Decay: This hurts everyone within a 15-yard area, marked by a green floor.
- Mind Control: She takes control of an enemy temporarily, boosting their damage and health.
- Dark Empowerment: Boosts revived Cult Adherents, making them do more area damage and be immune to spells.
- Dark Transformation: Turns a Cult Fanatic into a more powerful Behemoth, increasing their size and damage.
- Shadow Bolt: She uses this in Phase 1, dealing Shadow damage within a 100-yard range.
- Frostbolt: This is exclusive to Phase 2, causing Frost Damage and slowing movement for 4 seconds.
- Frostbolt Volley: A quick Frost Damage spell that slows movement.
- Touch of Insignificance: Reduces threat levels by 20%, stackable up to 5 times.
- Adherents: Strong against magic attacks, making it harder for spellcasters.
- +Fanatics: Resistant to physical attacks, making it challenging for melee fighters.
- Summon Vengeful Shade: Calls a Vengeful Shade to target a party member and attack with Vengeful Blast.
To win, you need teamwork, understanding these moves, and a good strategy for both phases.
Phase 1 Strategy: Coordination in Action
Plan your raid's moves for Lady Deathwhisper. Split into Ranged and Melee Teams for efficient focus and minion handling. The Ranged Team, focus on Lady Deathwhisper, while the Melee Team waits to deal with the summoned minions.
As the battle begins, position your raid on the stage, which is the upper platform. The tank, like the lead performer, is ready to handle the incoming waves of minions. Healers, the real heroes, are backstage, ready to heal injuries. Lady Deathwhisper, the star of the show, periodically summons new waves of performers, alternating sides of the room. It's a chaotic dance, a strategic performance.
Melee, clear one side quickly, transition smoothly to the other. Adherents need your focus. Casters handle Fanatics. Explosive adds need careful attention. Start with a coordinated Whirlwind.
Group up adds for melee's Cleave. Watch out for Lady Deathwhisper's Death and Decay, a harmful green circle move out fast to dodge it and keep DPS high.
Lady Deathwhisper directs the raid. Use crowd control wisely - Fear, Polymorph, or Cyclone - to keep things in tune. Coordination is key.
Phase 2 Strategy: A Battle of Skill and Timing
The start of Phase 2 is all about timing - your chance to change the tempo. Lower Lady Deathwhisper's Mana to a mere 5-10% before triggering this transition, cutting off her ability to summon more minions. The second act begins as her Mana Shield is breached.
In this phase, tanks take the spotlight again, stepping back into their critical roles. Keep aggro in check, as Lady Deathwhisper's Touch of Insignificance won't diminish your importance. The team coordinates kicks to interrupt Frostbolt casts, a straightforward idea but demanding the finesse of a seasoned professional.
One or two tanks handle the boss, while others skillfully deal with the adds on one side. Smooth transitions between extras and the main act add an extra challenge, a synchronized performance where every move matters. Your moment in the spotlight has arrived.
Heroic Mode
Heroic Lady Deathwhisper Phase 2 is harder. Cultists spawn every 45 seconds from East or West in groups: 2 Fanatics and 1 Adherent (East), or 1 Fanatic and 2 Adherents (West).
Use a third tank to gather adds for DPS takedown. It might disrupt boss damage, but a 10-minute limit ensures success. Watch out for Summon Spirit and Vengeful Blast.
A more efficient plan is moving Lady Deathwhisper between sides during waves. Two tanks can handle adds while on boss duty. They taunt Cult Fanatics, aid crowd control, and enable raid to clear adds and damage boss.
For a balanced approach, move Lady Deathwhisper for optimal DPS. Involve a third tank to handle adds without being heavily affected by Touch of Insignificance.
The Gunship Battle, often fondly called the Lootship fight, is a unique twist in the Icecrown Citadel raid. Instead of a usual boss, you're in an intense battle against the rival faction on their airships—the Skybreaker for the Alliance and Orgrim's Hammer for the Horde. It's chaos and control, cannon fire and clashes a titanic sea clash.
Gunship Battle Abilities:
Friendly Ship
- Heat: The Gunship Cannons use Heat to function. As the heat level hits 100, a cannon takes a break.
- Cannon Blast: Packs a punch with strong Siege damage.
- Incinerating Blast: Deals Siege damage with an extra kick based on heat. It uses up Heat.
Muradin Bronzebeard and High Overlord Saurfang
- Battle Fury: Increases damage by 12% for 20 seconds. Hits from Saurfang or Muradin refresh the effect.
- Cleave: Hits weapon damage on up to 3 targets in front of Saurfang or Muradin.
- Rending Throw: Deals Physical damage and leaves a stacking damage over time (DoT) when the tank is away.
All the Adds:
- Experienced, Veteran, Elite: Grow stronger with time, dealing more damage and acting faster.
- Desperate Resolve: Toughens up, with stronger armor and speed, when their health drops below 20%.
Skybreaker Sergeant or Kor'kron Sergeant
- Wounding Strike: Causes heavy weapon damage and reduces healing on the target.
- Bladestorm: Strikes up to 4 nearby targets every second for 6 seconds.
Skybreaker Mortar Soldier or Kor’kron Rocketeer
- Rocket Artillery: Targets a spot on the other ship and shoots a rocket, causing a fiery explosion on impact.
- Explosion: Hurts party members with fire damage and gunships with Siege damage.
Skybreaker Sorcerer or Kor’kron Battle-Mage
- Below Zero: Freezes the enemy gunship's cannons temporarily, stopping them from firing.
Skybreaker Rifleman or Kor’kron Axethrower
- Hurl Axe: Deals Physical damage.
- Shoot: Gives Physical damage.
Get ready for this sky brawl, show off your faction's power, and grab the loot from the high-flying battlefield!
Gunship Battle Strategy Guide:
To conquer the Gunship Battle, split your raid into two squads: one for defense and one for attack. Most of your crew should go on the attack, while a few handle ship operations and protection.
Attackers must eliminate the enemy mage and swiftly handle Rocketeers or Mortars. Afterward, assist in defense. On your ship, assign four skilled players for cannons targeting the Rocketeers or Mortars launching dodgeable rockets, but watch out for the slight knockback effect.
The enemy leader becomes way more dangerous with Battle Fury, a buff that boosts their damage by 12%. The enemy soldiers also get stronger as the battle goes on, but you can handle them. Pay close attention to Axe Throwers or Riflemen attacking from a distance. Sometimes, a mage will try to freeze your cannons. If you're on the attack team, deal with this mage fast. Meanwhile, the defence team should focus on dealing with Reavers or Marines, along with a teleporting Sergeant. Both become more dangerous the longer they're in the battle.
Have ranged DPS defend, dodge Sergeant's attacks, aid attack team. After mage's defeat, 4 defenders switch to cannons, resume attack on enemy gunship, repeat.
Be prepared for Saurfang or Muradin's challenge. Assign a skilled tank to manage them, watch out for their escalating Battle Fury buff making them hit harder. If the buff grows too strong, the tank may need to briefly leave the ship or use defense strategies for respite. Prioritize mages for a swift takedown. Stay coordinated, victory is close!
Here's a good plan for your raid team setup:
- Tanks: 2 Tanks - One grabs Commander's attention during boarding, focusing on Battle-mage. The other gathers intruders on your ship.
- Damage Dealers (DPS): 19-20 - Quick takedown of enemy Sorcerer or Battle-Mage helps your cannons wreck their ship fast.
- Healers: 3-4 - Raid damage is low, requiring healing for tanks mostly.
Get ready for a serious showdown with Deathbringer Saurfang, the fourth boss in this raid and a real combat expert. Saurfang starts strong with attacks. DPS warriors, unleash your power. Each hit brings Saurfang closer to using the dangerous mark.
He's famous for being one of the best warriors in the game, armed with a big, powerful two-handed weapon and wearing intimidating armor. He's fiercely loyal to the Lich King, playing a crucial role in the storyline as players work to face and defeat the Lich King.
Deathbringer Saurfang Abilities:
- Mark of the Fallen Champion: This makes Saurfang's attacks hit more than one target, dealing extra damage to a specific target. If the marked target dies while under this effect, Saurfang gets a 5% health boost. Nothing can remove this effect, not even death.
- Boiling Blood: Saurfang inflicts Physical damage every 3 seconds for 15 seconds.
- Rune of Blood: Allows Saurfang to steal health from targets marked with Rune of Blood when he hits them. This helps him recover health, 20 times the amount he stole.
- Call Blood Beast: Saurfang calls Blood Beasts into the fight.
Deathbringer Saurfang Strategy Guide:
In the Deathbringer Saurfang fight, be aware of his enrage at around 6 minutes. Ranged players should position strategically to lessen damage from Blood Nova. Healers, prepare to counter Boiling Blood's effects on affected players.
A good strategy involves careful positioning and predefined spots before starting the fight. Splitting into two groups reduces the impact of Boiling Blood. However, keep in mind that Alliance and Horde players experience slightly different aspects of this battle.
When Saurfang hits 100 Blood Power, he marks a player with Mark of the Fallen Champion. Keeping this marked player alive is vital, as failing to do so significantly heals Saurfang.
In tanking, quick taunt swaps are crucial. The tank with Rune of Blood should swap taunts efficiently to keep Blood Power flowing and heal from Saurfang's hits.
At regular intervals, Saurfang calls Blood Beasts. Ranged DPS players should quickly take these beasts down, especially considering their Resistant Skin, requiring single-target abilities for effective elimination.
On Heroic difficulty, the Blood Beasts get tougher, using Scent of Blood shortly after appearing. When Saurfang's health drops to about 30%, he goes into a Frenzy state, dealing extra damage. This is when you should strategically use Bloodlust or Heroism.
In this battle, stick to a solid plan. Tanks need to be strong, deal with debuffs fast, and healers must be strategic during Mark of the Fallen Champion.
Here's a good plan for your raid team setup:
- Tanks: 2 Having two tanks is crucial, especially during Rune of Blood, to maintain boss attention.
- Damage Dealers (DPS): 18-20 Speedy damage is the goal. Faster battle conclusion eases the challenge. More DPS aids in managing Blood Beasts efficiently and maintaining control.
- Healers: 3-5 Healing intensifies as the battle progresses due to Mark of the Fallen Champion. Fewer healers can make the fight faster.
Prepare for a showdown with Festergut, a fearsome foe lurking in the Plagueworks of Icecrown Citadel. Festergut's challenge is straightforward - it's all about a relentless attack. Let's break down this battle for a decisive victory.
Festergut Abilities:
- Gas Spore: Targets three unfortunate party members, dealing Physical damage after a tense 12-second countdown.
- Malleable Goo: Hits an area with damage, slowing attack and casting speed for 15 seconds.
- Gaseous Blight: Spreads Shadow damage across the entire party, like a dark storm.
- Inhale Blight: Boosts Festergut's damage and attack speed by 30%, after a 3.5-second countdown.
- Pungent Blight: Rains down Shadow damage on all party members, building anticipation for 3 seconds.
- Vile Gas: Deals damage every 2 seconds, causing infected allies to harm nearby comrades for 6 seconds.
- Gastric Bloat: Adds Nature damage, increasing by 10% with each cast, ready to explode in a Gastric Explosion after 10 stacks. This suspenseful condition plays out for 100 seconds.
- Gastric Explosion: Spells doom for the unfortunate party member afflicted, spewing Shadow damage onto their nearby companions.
Facing Festergut is all about ramping up that damage output, showcasing the raid's combined might. While the battle plan isn't overly complicated, a well-coordinated offensive assault is the key to triumphing over this formidable boss.
Festergut Strategy Guide:
As the fight begins, organizing your raid into three groups is crucial. Festergut, the embodiment of decay, turns berserk around 5 minutes into the fight. Healers dance through Gaseous Blight, ranged fighters tackle Vile Gas, and tanks manage Gastric Bloat, aiming to dodge explosive situations.
In heroic mode, another character joins the party Professor Putricide! He hurls Malleable Goo like a scientist unhinged, creating a chaotic yet exhilarating dance of dodging gooey bullets. Use three Inoculated debuffs like a shield against the goo storm. Grab them near the exploding Gas Spores, and you'll keep on living despite the danger.
Now, let's talk about Festergut's Inhale Blight. It's a cyclical move, reducing overall raid damage but making life harder for the tank. A calculated gamble for survival.
And who can forget the climax? Festergut's performance reaches its peak with Pungent Blight. Buffs are lost, the battle dynamic changes and it's a rollercoaster of intensity and relief.
In this dramatic play of agony and strategy, the main characters are the tanks - bravely taking the damage, maximizing their output, steering towards Festergut's defeat.
Here's a good plan for your raid team setup:
- Tanks: 2 Handle boss attention skillfully, especially before dangerous Gastric Bloat stacks.
- DPS: 17-19 Maximize damage output to bypass phases and threats like Pungent Blight.
- Healers: 3-5 Tanks face heavy damage during 3x Inhaled Blight phase. Swift damage dealing is vital due to a short enrage timer.
Imagine facing Rotface, a horrifying creation of stitched-together monstrosities that haunt the dreams of Azeroth's heroes. Engaging Rotface is like entering a nightmarish dance where one wrong move can lead to defeat.
In this grim place, your raid will move and evade, dodging Rotface's vile attacks. Pay attention to the green substance, it holds the key to your survival. Time your moves, coordinate well, and witness Rotface's disgusting resilience crumble before your determined efforts.
Rotface's Abilities:
- Mutated Infection: It slowly weakens you and even spawns an annoying ooze when it's done causing chaos.
- Ooze Flood: A relentless wave that slows you down with every hit, like quicksand but stickier and deadlier.
- Slime Spray: Hits you like a water gun filled with corrosive goo. Ouch!
- Vile Gas: Acts like a toxic cloud, making you sick and damaging your friends around you.
- Sticky Little Ooze: An annoying friend that slows you down.
- Weak Radiating Ooze: Supports the little ooze, making things messier.
- Big Sticky Ooze: A giant, sluggish dancer that hurts when it steps on your toes.
- Radiating Ooze: A scary, radioactive giant that absorbs the little oozes.
- Unstable Ooze: A powerful showstopper ready to explode as the dance intensifies, taking everyone down.
To conquer this challenge, you must master the steps. Control the oozes, dodge the spray, and survive the infections. Like any intricate task, coordination is crucial. One wrong move, and you'll find yourself in a gooey mess. So, gear up, bring your A-game, and let's show Rotface who the true champion of Icecrown Citadel is!
Rotface Strategy Guide:
To prepare for the battle with Rotface, position your team carefully, much like you did for Festergut. Before the fight, assign specific players to stand strategically around Rotface, especially to protect melee fighters from Vile Gas. About 10 players should stay away from this area. Vile Gas is powerful, so stopping its spread is crucial. Start the fight with a bang by using Bloodlust or Heroism right away.
For tanking, use two tanks. Assign one to handle Rotface and the other to deal with the small oozes. Keep Rotface in the middle of the room, and have the second tank control the movement of the oozes around him.
After Mutated Infection, gather two oozes, cleanse the kiter's infection near the second ooze, or let it fade. When five small oozes merge, the big one appears—Healers watch, Off-Tank handles big ooze.
Be careful not to guide oozes through others! DPS players have a short 4-second window to move away from the exploding ooze. Stay away from the harmful green Ooze Flood, which slows you down and hurts. Whenever Rotface turns his head, quickly move to dodge Slime Spray. Watch out for big ooze blasts and dodge the small ooze grenades.
Check for Vile Gas before grouping. If present, avoid rushing back to melee. Healers, stay close to the boss for effective healing. Paladins, use Divine Shield and Hand of Sacrifice for Unstable Ooze Explosion.
Here's a good plan for your raid team setup:
- Tanks: 2 Tanks - One at center for Rotface, the other kiting Big Oozes.
- Damage Dealers (DPS): 17-19 - Swift end crucial to avoid Infections and Big Oozes.
- Healers: 3-5 - Manageable raid damage with proper mechanics.
Let's demystify Professor Putricide, a boss known for his odd and crazy personality in Icecrown Citadel, a challenging dungeon in WoW. He's the mastermind behind scary creatures like Festergut and Rotface. Facing him means dealing with high difficulty and needing fast movement.
In Icecrown Citadel's story, he's the chief creator of scary creatures and deadly plagues, all serving the Lich King, the big villain of this expansion.
Professor Putricide Abilities:
- Unbound Plague: Hurts more with time, making fast removal crucial.
- Unstable Experiment: Creates either Gas Cloud or Volatile Ooze.
- Slime Puddle: Makes a puddle at specific spots.
- Choking Gas Bomb: Explodes after 20 seconds, hurting anyone nearby.
- Choking Gas Explosion: Follows the bomb explosion, dealing damage and reducing hit chance.
- Malleable Goo: Slows and damages those it hits.
- Mutated Strength: Boosts Putricide’s damage and speed.
- Mutated Plague: Heals Putricide based on the plague's stacks.
Let's break down the fight into phases and figure out strategies to defeat this alchemy-fueled threat. Ready to outsmart the mad professor and triumph in Icecrown Citadel? Let's do it!
Professor Putricide Strategy Guide:
In the Icecrown Citadel, a twisted genius named Professor Putricide awaits. He's the brain behind scary creatures and deadly plagues, making him one tough boss.
This battle unfolds in three phases. Phase 1: The Professor assaults you with vile potions. Phase 2: He unleashes his monstrous creations. Phase 3: He melds both, and it spirals into chaos! It's akin to a horror movie building to its climax.
Phase 1: Plague Dance
In the beginning, split your team into three groups: ranged attackers, healers, and bold melee warriors. Swiftly control the spreading of disease, quick action is key. Melee fighters, halt its progression promptly, ideally within 8-10 seconds. Maintain coordination for dealing with the dangerous green oozes.
Phase 2: Ooze Madness
As the battle continues and Putricide weakens, Phase 2 begins with new challenges. Oozes and Choking Gas Bombs threaten your team. Dodge the Malleable Goo and prepare for the Choking Gas Explosions. Stick to the formations from Phase 1 and be fast with disease transfers. Melee champs and tanks, keep an eye on those Choking Gas Bombs. Move carefully to avoid their debuffs. Plan a smooth shift of around 37% health to deal with the incoming oozes.
Handling the goo, avoiding the gas, and managing the slime puddles while focusing on the Volatile Oozes is like juggling a challenging act! The Volatile Oozes should be your main target. Only shift your attention to Professor Putricide when the oozes aren't around.
Phase 3: The Last Stand
We're at the epic end, the wild climax of Professor Putricide's crazy lab show! In Phase 3, the speed and craziness go off the charts. It's a race to beat the clock, and everything is at max volume.
In the final phase, positioning is key. Oozes and Choking Gas Bombs are still dangerous. The Slime Puddle can't be absorbed anymore, so keeping the center clear is vital. Boss movement must be precise to dodge debuffs on melee fighters.
Tanks, coordinate your taunts to minimize raid damage. Focus on healing tanks and be ready to make sacrifices if needed. Unleash the fury with Bloodlust, Heroism after handling the oozes, but plan it smartly. Consider letting players with the disease go down, planning to revive them strategically later.
Here's a good plan for your raid team setup:
- Tanks: Get 2-3 strong tanks: 2 for boss, 3rd for backup or tough times.
- Damage Dealers (DPS): 17-19 DPS players. To finish the final phase, hitting hard and fast is vital. Time is key!
- Healers: 4-5 — The raid takes substantial damage, especially in Phase 3, which turns into a high-speed DPS challenge. However, try to maintain the healer count on the lower side.
Get ready for the deadly fight with Professor Putricide. Adaptability and strategy are your best friends.
Welcome to the Blood Prince Council showdown! Here, you face off against three tricky blood elf princes: Valanar, Keleseth, and Taldaram. They each bring their own bag of challenges. Handling all three at once isn't a walk in the park. You need to be sharp and have a solid game plan.
The physical princes need brave tanks to take them on, while the shadowy prince prefers a partner who can absorb his tricks, like a Warlock. The trick here is switching partners smoothly every 45 seconds to adapt to the changing beat.
Blood Prince Council Abilities:
- Shadow Prison: Think of it as quicksand, but meaner. Stay still or face the consequences!
- Kinetic Bomb: Drop from above like unwelcome surprises. Defuse them fast or brace for a blast!
Prince Valanar
- Empowered Shock Vortex: Whoosh! A wave of pain and a push-back.
- Shock Vortex: A mini-whoosh of pain and a push-back.
Prince Keleseth:
- Shadow Lance: A dark bolt of ouchies.
- Empowered Shadow Lance: An even bigger, nastier bolt of ouchies.
- Summon Dark Nucleus: He likes dark company. Trouble incoming.y
Prince Taldaram:
- Conjure Flame Sphere: Fireball alert! Watch out for the heat.
- Summon Small Flame Sphere (in normal form): Mini fireballs. Cute, but dangerous.
Blood Prince Council Strategy Guide:
The Blood Prince Council battle is intense and happens in one phase, lasting for a maximum of 10 minutes. You need a solid plan, especially if you're in a 10-player group.
Understanding the Princes and What They Do
Prince Valanar:
- Kinetic Bombs: Quickly destroy these bombs, especially if you're ranged DPS, to avoid hurting the whole team.
- Shock Vortex: When he uses this, spread out to avoid getting pushed back.
Prince Keleseth:
- Shadow Lance: Keleseth mainly attacks from a distance. He's good for a ranged tank. Tank needs to handle Dark Nuclei to reduce shadow damage.
- Dark Nuclei: These entities don't follow the usual aggro rule. They go for the last player who attacked them.
Prince Taldaram:
- Fiery Orbs: Taldaram targets a random team member with fiery orbs. Stand together to share the damage.
- Empowered Flames: When he's extra powerful, position yourselves smartly to reduce damage from fiery balls.
Where you stand and how you move matters a lot. Each prince has different moves, so position accordingly. Healers, expect and be ready to heal big hits, especially when the princes are extra powerful. The damage dealers need to be smart in choosing their targets, switching between Kinetic Bombs and the most powerful prince at that moment.
Handle the princes' abilities, stay alive, and victory will be yours.
A grand stage with Blood-Queen Lana'thel at its center, a powerful San'layn under the control of the Lich King, she enters with grace and power. You've got about 5 and a half minutes to defeat her, a true test of speed and strength. She'll test your reflexes and combat skills, so let's break down her mysterious moves and plan for victory.
There are two parts to this battle. The air phase, a 12-second dramatic pause every 100 seconds, and the ground phase, where most of the action happens. Dodging her attacks is like a deadly dance, testing your raid's endurance.
Blood-Queen Lana’Thel Abilities:
- Swarming Shadows: Purple flames engulf random raid members. Move quickly to the edges to avoid chaos.
- Pact of the Darkfallen: A crimson beam links players. Stay close to each other to avoid hurting nearby allies with Shadow damage. Stick together!
- Bloodbolt Whirl: In the Air phase, a dark blood bolt targets and damages a player. Keep an eye on the skies.
- Essence of the Blood Queen: Lana'thel's bite turns a player into a powerful Vampire for 60 seconds, boosting damage and enabling self-healing. But watch out for Frenzied Bloodthirst, pass the vampiric gift quickly.
- Shroud of Sorrow: Ongoing Shadow damage to nearby enemies. Stay vigilant!
- Twilight Bloodbolt: A ranged bolt of dark blood causing damage to the target and nearby allies. Dodge and move to lessen its impact.
- Blood Mirror: Lana'thel links the Main Tank's damage to another raid member. Stay close to the tank!
To conquer this dance, stay agile, communicate, and watch each other's backs. Maneuver through the shadows, master the rhythm, and the spotlight of victory will be yours!
Blood-Queen Lana’Thel Strategy Guide:
To come out on top, you need a clear plan for biting and strategic positioning. Let's break it down step by step to beat this tough opponent.
Plan who will get bitten first, usually high damage dealers, and spread the bites smartly for maximum damage. Healers should be at the edges of the inner circle to cover healing effectively. Arrange ranged damage dealers on both sides, keeping a good distance for the best damage.
Tanks need to hold Lana'thel in a spread-out formation for efficient damage and healing. Healers should focus on healing players affected by Blood Mirror, especially the less resilient ones. Keep the Main Tank and Off-Tank close to each other to share incoming damage well.
Move quickly away from Swarming Shadows to avoid the damage, positioning near the walls during this phase. When linked during Pact of the Darkfallen, move together to cancel its effect. Maintain a safe distance during Twilight Bloodbolt and make sure healers are healing efficiently.
Air Phase:
Spread out to lessen the damage from Bloodbolt Whirl during the Air Phase. Use defensive abilities and good area healing to survive the damage. Stay alert at the start of the Air Phase for AoE Fear, and use abilities like Fear Ward and Tremor Totem.
Here's a good plan for your raid team setup:
- Tanks: 2 Tanks — One grabs the boss, the other handles a damaging ability.
- DPS (Damage Dealers): 17-19 — Strong DPS is key to victory in this battle.
- Healers: 4-6 — Healing is vital, especially in tough phases, needing group healing.
This battle centers around the Vampiric Bite mechanic - do it just right, and you'll conquer Blood Queen Lana'thel. May your raid be quick and triumphant!
Get ready for a critical battle in Icecrown Citadel's Frostwing Halls—Valithria Dreamwalker awaits. Once a gentle Green Dragon, she's now trapped in the clutches of the Scourge. Healers play a crucial role. Healers work to heal the dragon while also fighting off enemies, like balancing on a tightrope.
Success in this battle depends on the healers' skills and coordination, much like a well-coordinated team. Every heal is a sign of resilience, and defeating enemies is a triumph.
Valithria Dreamwalker's Abilities:
- Invoke Nightmare Portal: Triggers the Dream State.
- Twisted Nightmares: Endure Nature's wrath, stack its power, wield it, and survive.
Scourge Enemies:
- Blazing Skeleton: Throws fiery challenges with Fireball and Lay Waste.
- Blistering Zombie: Unleashes acid bursts an d corrosion, eating at armor and resolve.
- Risen Archmage: Weaves a wintry tale with Column of Frost, Frostbolt Volley, and Mana Void.
- Gluttonous Abomination: Uses Gut Spray, dealing damage and making foes more susceptible to pain.
- Rot Worm: Emerges from the Abomination's demise, craving your strength.
- Suppressor: Casts shadows over healing, suppressing the light of recovery.
In this chaotic symphony, synchronize your healing crescendo. Dance between the Dream State and the waking world. Let the Nightmares empower you. May your healing be swift, and your allies restored. Remember, in healing Valithria, victory is yours.
Valithria Dreamwalker Strategy Guide:
Taking on the courageous task of healing Valithria Dreamwalker demands skill and bravery. Here's a simple guide to help you succeed.
As the battle begins, Valithria is at 50% health, wounded but resilient. Your goal is to heal her while facing off against relentless Scourge foes who want to stop you. Healing is crucial, with DPS providing vital support.
At the start, all healers focus on healing Valithria. But as the battle progresses, strategic changes are key. Divide the healers into two groups - one healing Valithria and the other taking care of the raid's health. Be adaptable, as raid damage increases over time.
Portals in the room spawn additional enemies. Handling these portals effectively is crucial. Plan how to stack up within the portals, an important part of the battle. Healers, group up for efficient stacking. Timing is crucial - wait a moment after exiting the Summon Nightmare Portal zone before stacking to ensure it doesn't vanish.
Be careful around Blistering Zombies, they explode with Acid Burst upon defeat. Gluttonous Abominations have a lot of health and spawn Rot Worms when defeated. These Rot Worms deal significant melee damage and should be taken down quickly.
Communication is vital, especially for healers going into the Dreamstate. Maximizing Emerald Vigor stacks can speed up the encounter significantly. Tanks and DPS, be aware of the different types of adds and adjust your priorities accordingly. Every class with healing abilities should help heal Valithria whenever possible, as each instance of healing makes a big difference.
May your skills be sharp, your spells powerful, and may you triumph against the relentless Scourge.
Here's a good plan for your raid team setup:
- Tanks: 1 Tank — A strong tank can handle the Gluttonous Abomination that appears roughly every minute.
- DPS: 14-19 — Maintain a balance between damage dealers and crowd controllers to handle waves of undead effectively. Keep the damage coming and enemies in check!
- Healers: 5-10 — More healers mean a faster recovery for Valithria Dreamwalker and a quicker end to the encounter.
Sindragosa is the final challenge and the tough 11th boss in the Frostwing Halls in Icecrown Citadel. Before, she was Malygos' companion before he went crazy. Neltharion, using the Dragon Soul, defeated her, resulting in her death. However, she was later resurrected by the Lich King far up in the North. While not an extremely tough battle, it requires constant focus and meeting the required DPS.
In Phase 1, facing Sindragosa is fearsome, but we stand strong. We evade icy assaults, combat her lethal plague, and manage freezing bombs. Next, she soars a majestic dragon maneuver. Our moment to strategize, regroup, and strike from afar. Caution: her aerial attacks pack a punch.
On the ground, the fierce battle continues. Sindragosa is relentless, but so are we. It's a survival challenge, testing skills, and teamwork. Healers strive, tanks hold firm, and DPS push to bring her down.
Sindragosa Abilities:
- Tail Smash: Hits enemies close to the tail, pushing them back.
- Frost Aura: Deals Frost damage to nearby enemies every 3 seconds.
- Icy Grip: Pulls the whole raid towards her for Blistering Cold.
- Blistering Cold: Deals big Frost damage to enemies in a 25-yard range.
- Unchained Magic: Causes Arcane backlash after 8 seconds.
- Instability: Deals Arcane damage per stack when under Unchained Magic, 5 seconds after using a spell. In heroic mode, it damages friendly targets within 20 yards too.
- Frost Beacon: Picks a target for imprisonment in an Ice Tomb.
- Ice Tomb: Makes orbs of icy energy to encase enemies in ice blocks.
- Frost Bomb: Causes Frost damage that can't be healed to all nearby targets.
- Mystic Buffet: Hits nearby enemies with magic every 6 seconds, increasing magical damage taken by 10% per stack. Lasts 8 seconds.
- Penetrating Cold: Makes melee DPS take physical damage, with 1,000 frost damage per stack every 2 seconds.
- Frost Breath: Deals a lot of Frost damage to enemies in a 60-yard cone in front of her. Also, reduces attack speed by 50% and movement speed by 15%.
Sindragosa's Strategy Guide:
Sindragosa, once Malygos' partner, got brought back by the Lich King to rule the Frostbrood, causing shivers across Icecrown Citadel. The fight has two phases: Phase 1 from 100% to 35% HP, and Phase 2 from 35% to 0% HP.
First Phase (100-35% HP):
When the battle starts, give the tank time to grab Sindragosa's attention. The tank's job is to position Sindragosa smartly to avoid dangerous attacks. Melee fighters should dodge Tail Smash, Frost Breath, and prepare for Blistering Cold.
Watch out for Penetrating Cold stacks keeping them around 8 or 9 is key for healers. If Sindragosa puts Unchained Magic on you, stop your spells since it can be deadly.
Healers, make sure Unchained Magic stacks stay below 5 or 6 and keep a good distance from the raid. When Icy Grip starts, quickly move away from Sindragosa to dodge the Blistering Cold. Use abilities like Blink, Ghost Wolf, or Disengage for a safe escape. When Sindragosa takes flight, she marks six players with Frost Beacon.
It's vital to identify these players, and a Paladin should use Hand of Freedom on the tank for a smooth transition to the air phase. During the air phase, focus on destroying Ice Tombs, and everyone should take cover behind them to avoid Frost Bombs.
Second Phase (35-0% HP):
In Phase 2, Sindragosa uses Mystic Buffet. It's crucial to not stack more than 5 or 6 Mystic Buffet, avoiding magical damage during Unchained Magic. Tanks can employ cooldowns to mitigate effects.
In this phase, Sindragosa places Frost Beacons on players, forming Ice Tombs mid-air, similar to the air phase. Position behind these Ice Tombs to dodge Mystic Buffet and shift between left and right Tombs to handle Blistering Cold and Frost Bombs. Execute this strategy well for victory. Stay confident — precision is key!
Communication is crucial, especially during the air phase, to ensure players hide behind Ice Tombs and prioritize freeing trapped allies. Tanks should expect tank swaps due to debuffs and ensure Sindragosa is away from the raid to minimize damage from cleaves.
Here's a good plan for your raid team setup:
- Tanks: Aim for 1-2 Tanks. Two tanks aid in smooth position switches during Phase 2, resetting Mystic Buffet stacks. However, a single tank with strong Frost Resistance can work if raid DPS is high for a quick finish.
- DPS (Damage Dealers): Aim for 15-19 DPS. While high DPS isn't crucial, it speeds up Phase 2, offering a benefit in the battle.
- Healers: Have 5-8 healers. The enrage timer provides ample time, making it common to have a good number of healers to handle Unchained Magic and maintain healing.
Get ready for the biggest challenge in Icecrown Citadel - the Lich King. This boss is the kingpin of the raid, and beating him requires excellent teamwork, sharp awareness, and a good plan. The Lich King has a bunch of tough moves and abilities that need a solid team to deal with.
First, let's discuss reaching the Lich King in ICC. It's tricky! Defeat prior bosses, locate the portal (not easy), and only after clearing Sindragosa's area, a portal appears on the central platform.
Now that you know how to reach the Lich King, let's dig into the core of this guide and figure out how to defeat this powerful foe.
The Lich King Boss Abilities:
- Unleash Drudge Ghouls: Calls in 3 Drudge Ghouls over 3 seconds.
- Invoke Shambling Horror: Creates a Shambling Horror with Shockwave and Enrage abilities.
- Soul Reaper: Hits a target, causing damage and cursing them with Soul Reaper. After 5 seconds, this curse deals a lot of Shadow damage and makes the caster faster for 5 seconds.
- Necrotic Plague: Spreads a lethal plague, dealing heavy Shadow damage every 5 seconds for 15 seconds. If the target dies or when the effect ends, it jumps to a nearby person, boosting the Lich King if removed..
- Plague Siphon: Boosts Lich King's damage by 2%, increasing with each Necrotic Plague jump.
- Infest: Hits all enemy players with Shadow damage, and the damage grows per second. It stops when the target's health is over 90%.
- Merciless Frost: Creates a large frost storm, damaging all enemies within 45 yards over time.
Arthas, the Lich King, is the ultimate challenge in Icecrown Citadel, symbolizing the pinnacle of Wrath of the Lich King. Confronting him is like an epic 15-minute marathon through four phases. Heroic mode elevates this challenge, posing a formidable hurdle, especially in Classic's early weeks.
The Lich King Strategy Guide:
Get ready for a massive showdown with the Lich King, the final boss in the Icecrown Citadel raid of Wrath of the Lich King Classic. This is a multi-phase battle, each having its unique challenges demanding precision and teamwork. Let's break down this tough encounter step by step.
Phase 1: 100-70% HP. Starting Off: Cold and Unforgiving
The fight begins by placing the Lich King in the middle of the platform. Off-Tanks handle Shambling Horrors, making sure they face away from the raid. DPS should deal with Drudge Ghouls, preventing them from going into a frenzy. Healers need to watch out for Infest, a damaging debuff, to keep the damage under control. At 70% health, the fight shifts to a new platform.
Transition Phase 1.5: Dealing with the Storm
Spread out to avoid damage from Pain and Suffering and Ice Spheres. The Off-Tank's job now includes managing Raging Spirits, while Ranged DPS focus on Ice Spheres to avoid disruptions. This phase needs careful positioning and target priority before transitioning back to the main platform.
Phase 2: 70-40%. The Frozen Heart: Balance is Key
The Main Tank stays in the center, and the Off -Tank deals with any remaining Raging Spirits. Handling the Plague Siphon debuff becomes crucial as it boosts the Lich King's damage. DPS and healers need to stack up to manage Val'kyr Shadowguards and Defile. Proper movement and positioning are essential to avoid wiping due to Defile. At 40%, the raid moves to another platform.
Transition Phase 2.5: The Calm Amidst the Storm
Similar to the first transition, focus on managing Raging Spirits, now without the presence of Shambling Horrors and Drudge Ghouls. The Off-Tank should keep control of Raging Spirits, and DPS should eliminate them.
Phase 3: 40-10%. The Climactic Showdown: Embrace Destiny
The final phase begins with quickly dealing with Raging Spirits. When Harvest Soul triggers, ensure your health is high to survive the stun effect and the ensuing damage. Inside the Frostmourne room, gather in the center before choosing a safe location for bomb drops. Executing these mechanics leads to the ultimate face-off with the Lich King.
At 10% HP, the boss casts Fury of Frostmourne, resulting in the raid's demise. Resurrection and actions are impossible. It may seem like an Enrage, wiping everyone. But in reality, this marks the Lich King's defeat!
During the battle, coordination between tanks, healers, and DPS is vital to handle the Lich King's mechanics. Intelligent placement, swift decision-making, and proper target selection are key factors that influence the encounter's result.
Tips for a Triumphant Triumph:
- Tanks: Keep an eye on the boss's back for Shadow Traps or Defile spawns and quickly move the boss away from them. Save defensive cooldowns for when The Lich King reaches 15+ stacks of Plague Siphon.
- Healers: Be clever when dispelling Necrotic Plague, coordinate with Ghouls or Horrors for a safe transfer.
- Ranged Fighters: Avoid dealing excessive damage to Drudge Ghouls and use Nitro Boosts if targeted by Defile.
- Melee Fighters: Be careful with damaging Drudge Ghouls and position yourself well against Raging Spirits to avoid Soul Shriek hits. Use Nitro Boosts if targeted by Defile.
Gear up, coordinate with your raid, and get ready for the ultimate battle against the Lich King!
Treasures Await: Loot, Mounts, and Rewards in Icecrown Citadel
Picture stepping into the icy depths of Icecrown Citadel, not just facing cold and wind, but a treasure trove of rewards. Legendary loot is our driving force to storm the citadel week after week.
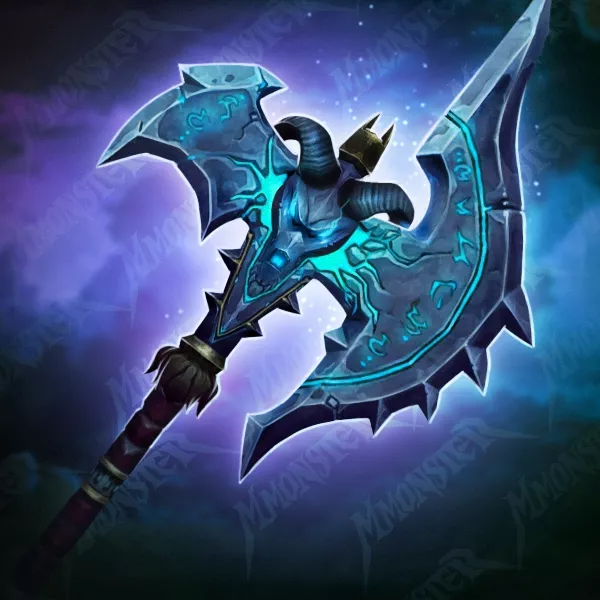
Think about wielding Shadowmourne, a legendary mega axe oozing power and history. It's a weapon a symbol of strength, a mark of your prowess in the frozen lands of Northrend. You'll find awesome Mounts and Tier 10 gear too!
Shadowmourne Legendary Two-handed Axe
Imagine wielding a weapon that's not just the strongest in the game but also packs a serious punch with its Chaos Bane effect. This power cranks up your damage to mind-boggling levels. With each swing, you amass Soul Fragments, stacking up to 10. And when the time is right, you can unleash Chaos Bane a devastating torrent of Shadow damage that engulfs anyone bold enough to face you, all while bolstering your strength to endure and conquer.
However, obtaining Shadowmourne is anything but easy. It begins with gaining the nod of approval from The Ashen Verdict, the guardians of justice. From there, you set out on quests, utilizing Primordial Saronite, and quenching your weapon's thirst for souls. You infuse it with the might of Unholy, Blood, and Frost, readying it for the battles that lie ahead.
And getting it is no easy feat: it takes time, skill, and a well-coordinated team. Now, think about making this journey faster. With our Shadowmourne boosting service, time is on your side. We promise a quick finish, mastering this legendary axe faster than you'd believe.
WotLK Classic Shadowmourne Boost
Tier 10 gear
In Icecrown Citadel, Tier 10 gear awaits a game-changer for battles. Tailored to each class, it comes in three levels: ilvl 251, 264, and 277. Earn it with Emblems of Frost by beating citadel bosses. For the highest power, grab Marks of Sanctification from Heroic-difficulty ICC.
Tips: Start from the lower tier, like climbing a ladder, advancing step by step. The in-game interface simplifies switching between raid difficulties, ensuring a smooth ascent through the citadel's icy challenges.
Invincible Mount and Glory of the Icecrown Raider
In the freezing halls of Icecrown Citadel, danger is everywhere, but there's also something remarkable a treasure trove of prestige in the form of mounts. They symbolize skill and standing in the WoW community.
At the heart of Wrath of the Lich King Classic Phase 4 lies a legendary dream for adventurers The Invincible's Reins mount. This incredible flying mount awaits those daring enough to face the Lich King, the ultimate foe of Icecrown Citadel.
Such a coveted reward, and you don't have to worry about the challenges of obtaining it! Opt for The Invincible Mount Boost Carry, and let our seasoned MmonsteR players lead the way. Sit back, relax, and witness your character rise with the majestic Invincible by its side.
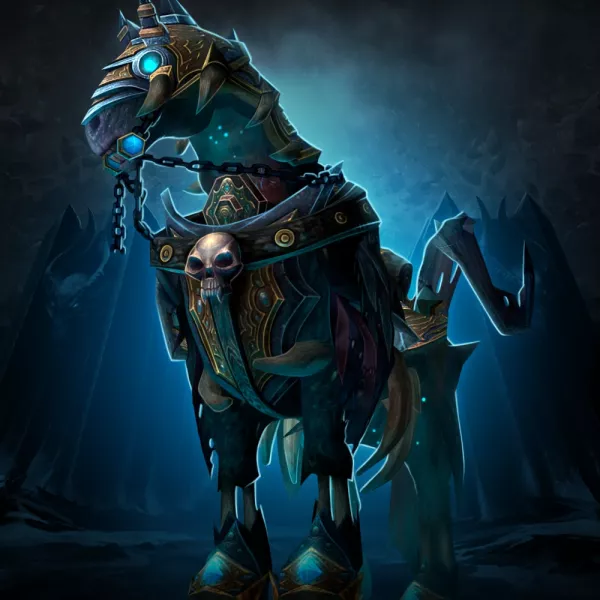
WotLK Classic Invincible Mount Boost
In the depths of the icy castle lies another dreamy prize: Reins of the Icebound Frostbrood Vanquisher. This 25-player raid reward screams skill and bravery, a true mark of honor.
To obtain these exceptional flying mounts, complete the challenging Glory of the Icecrown Raider Meta-Achievement. These mounts symbolize honor earned through determination and courage, requiring adventurers to conquer specific challenges and triumph over bosses in 10 and 25-player modes.
After mastering all 14 meta-achievements, the 10-player mode awards the Bloodbathed Frostbrood Vanquisher, while the 25-player mode grants the majestic Icebound Frostbrood Vanquisher to daring champions.
Reach new heights with our Icecrown Raider boost. Our expert players will guide you through challenges, earning you rewards and acclaim. The journey to glory has never been more exciting!
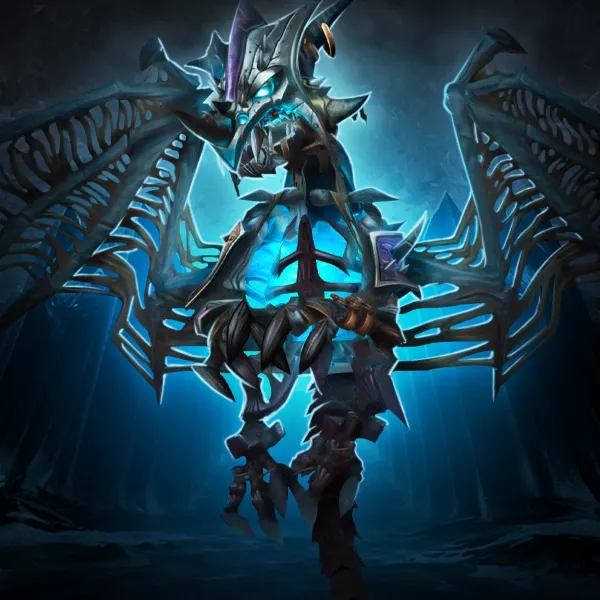
WotLK Classic Glory of the Icecrown Raider
As we wrap up this detailed guide to the trials and victories of Icecrown Citadel, let's take a moment to think about the enormity of the adventure that lies ahead. The bigger the story, the tougher the test. The road is full of obstacles, requiring your dedication, courage, and a strong bond with your team, a connection that isn't always easy to form. But don't worry, help is always available on this adventure.
The Lich King may seem unbeatable, but so did every boss before him. The frozen throne is close, and we're here to guide you as you strive for greatness. And for those moments when you want to enjoy the adventure without breaking a sweat, trust Mmonster to complete the raid at any difficulty for you.