

Diablo 4 Secret Cow Level: Full Quest, Moo Shortcut and Fixes
There are two ways into the Secret Cow Level in Diablo 4. The fast one needs a friend: a player who has finished the cow quest uses the Moo emote next to you at the Holy Cedar Tablets outside Kyovashad, you carve "Moo" into the wood yourself, and a portal opens for you on Skartara in Skovos. The long one is the full quest across three regions. Only the long way gives you the achievement, the Moo title and your own Moo emote.
Quick version
- Just want to get in: find someone with the Moo emote, meet at the Holy Cedar Tablets and use the Moo shortcut. You can do it any day of the week.
- Want the rewards: collect a Stamina Potion (base game), a Rusted Bardiche (Nahantu) and Neyrelle's Hand (Skovos), then combine all three in the Horadric Cube in Temis.
- First trip after the full quest: take the Outcast's Boat to the island of Scylara. Its cellar portal only opens on a Tuesday.
- You need: Vessel of Hatred for Nahantu and Lord of Hatred for Skovos.
- Before you start: make common (white) items visible in your loot filter. Several quest items drop as commons.
This guide follows the order of the quest. We haven't played the chain ourselves for it. The steps come from the community guides that first mapped the quest in May 2026, and on October 25, 2026 (patch 3.2.3) we compared them with each other and took the item, place and option names from the game's own text. Where players found a problem and a way around it, we say so and say how sure that fix is.
Shortcut or full quest: pick your goal first
Both roads end at the same portal, but they don't give you the same things. If you mainly want to farm the Cow King, for example for Prime Ribs to summon Moophisto, the shortcut is enough.
| What you get | Moo shortcut from a friend | Full cow quest |
|---|---|---|
| Entry to the Secret Cow Level | Yes, through a portal on Skartara, any day | Yes: first through Scylara on a Tuesday, then the same Skartara portal |
| "There Is No Cow Level" achievement | No | Yes |
| Moo title and Moo emote | No | Yes |
| Torn Page and the boat to Scylara | No | Yes |
| You can give the shortcut to others | Unconfirmed: the shortcut gives you no Moo emote, and no guide confirms you can pass access on | Yes, with your own Moo emote |
The Moo shortcut from a friend
- Meet your friend at the Holy Cedar Tablets by the southwest entrance of Kyovashad in the Fractured Peaks. These are the tablets where the campaign asked you to carve a sin.
- Your friend uses the tablets and picks Inscribe "Moo" into the wood., then stands right next to you and uses the Moo emote.
- Now use the tablets yourself. The Moo option is there for you too. Pick it.
- Teleport to Fool's Quarry on Skartara, the western island of Skovos, and head north to the small nook with the Outcast's Journal. The golden portal next to it leads into the Cow Level.
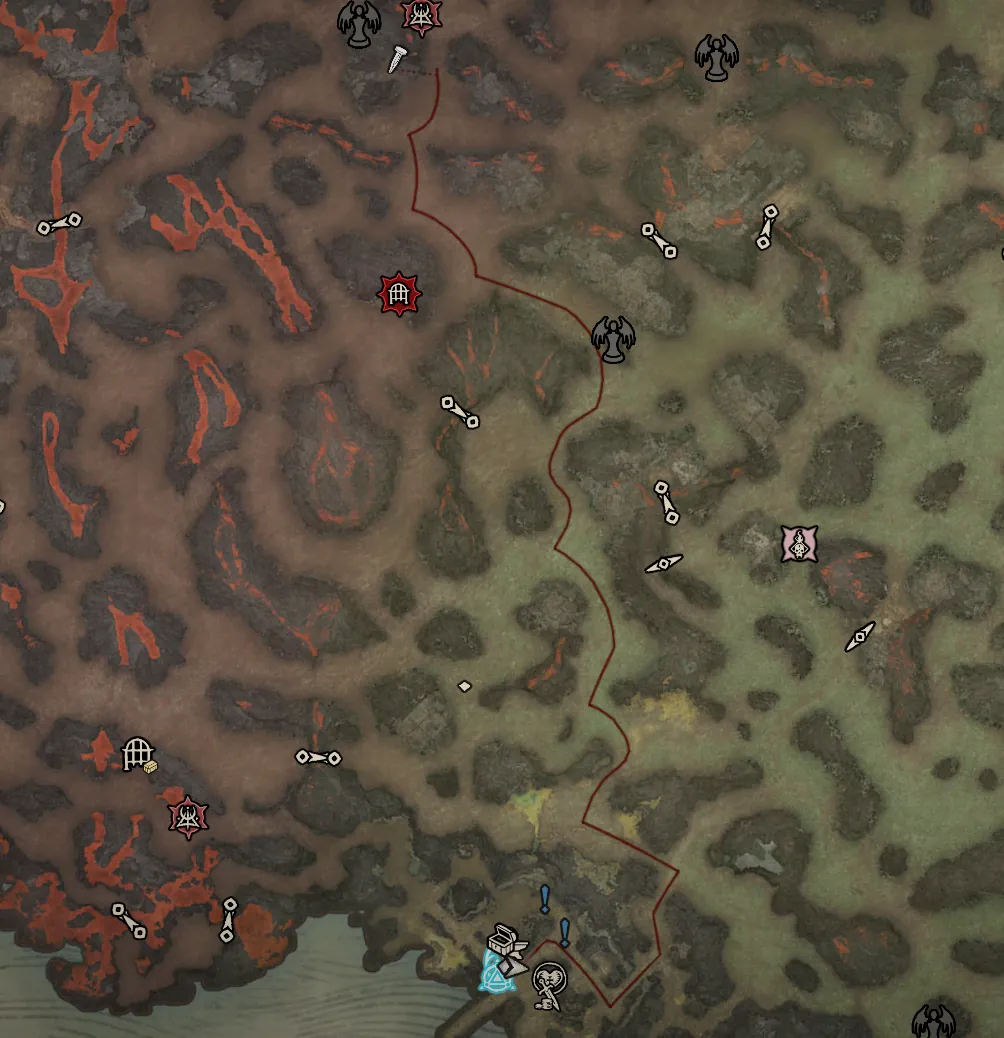
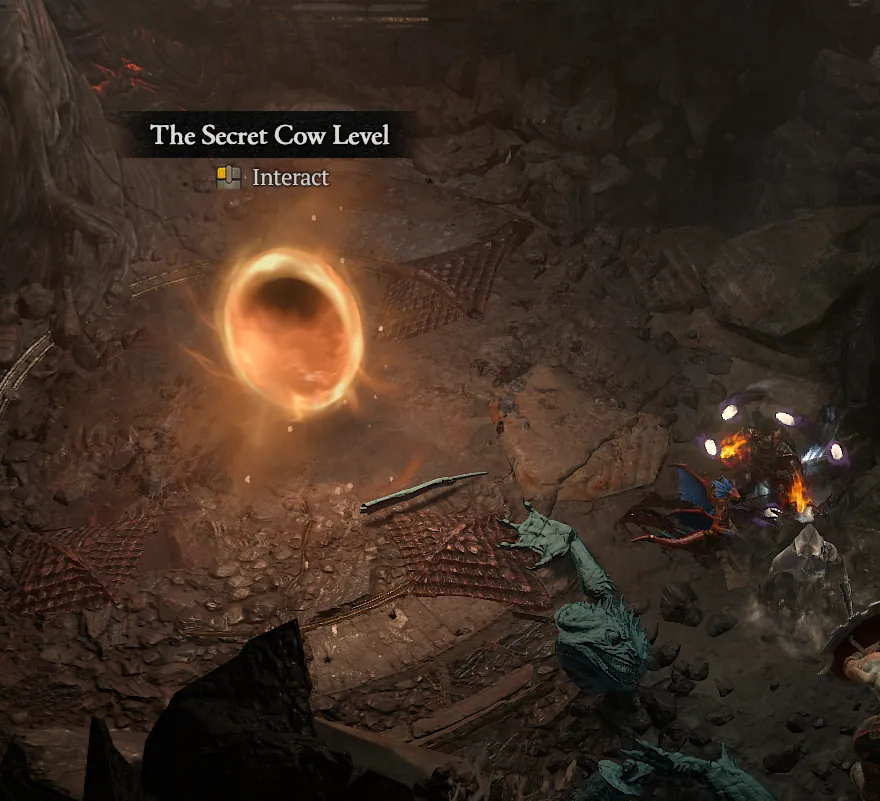
Your friend needs the Moo emote, and that comes with the full quest, so someone who finished it is the safe choice. One guide says having Moo selected at their own tablets is enough, but no other source confirms it. The same guide adds that the portal then works for your whole account. Inside you can reset the level with Reset Dungeons like any other dungeon. Some older guides put this portal in Scosglen, which is wrong: it sits on Skartara.
Before you start the full quest
Most stuck quests we found in player reports come from a setting or a detail that is easy to miss. Go through this list once:
- Loot filter: show common (white) items. The base-game relics, the Amazonian Bolt, the Amazon Training pieces and the Rusted Bardiche can all hide behind a filter.
- Check your stash: the Stamina Potion and the Rusted Bardiche can be traded and stored. If you farmed them in an earlier season, or a friend has spares, you can skip the first two parts.
- Expansions: Nahantu needs Vessel of Hatred, Skovos needs Lord of Hatred.
- Normal difficulty: several steps are easier with fewer monsters around. You can switch for those and switch back.
- Mercenary off: players report that a mercenary can block the Blood Lightning drop, the crow and the Mother's Rose. Dismiss it for the whole quest.
- Class for the Crooked Staff: that step needs a fight with only the basic attack. One guide says Paladins and Warlocks can't do it, so plan a fresh character of another class if you play one of them.
- One character for Skovos: do all three Skovos relics on the same character. A player who burned one of them on an alt didn't get the key until redoing it.
You can also split the work. Each of the three parts stands on its own, so the order and the number of evenings are up to you.
Part 1: the Stamina Potion (base game)
Kill 666 cows for the first relic
Every character has a hidden cow counter. When it reaches 666 cows, a relic drops, and the region of that last kill decides which one you get:
- Bloody Wooden Shard: last cow in Hawezar (some guides add Kehjistan).
- Musty Tome: last cow in Scosglen (some guides add the Fractured Peaks).
- Intricate Metallic Fragment: last cow in the Dry Steppes.
Any cow counts toward the total, wherever it dies, and guides say cows killed by group members close to you count as well. So farm the bulk anywhere and walk into the right region for the last few kills. After the first relic, the other two only drop by chance, and guides describe that chance as very low. A second or third character gets its own guaranteed drop after another 666 cows, and the relics drop on the ground for anyone nearby, so pick them up right away.
A faster way to count cows: if someone in your group already has the Forlorn Hovel open, join them, enter their cellar, kill the cows inside, leave and use Reset Dungeons. Shortly before 666, travel to the region of the relic you still need for the final kills.
Cleanse the relics in Ked Bardu
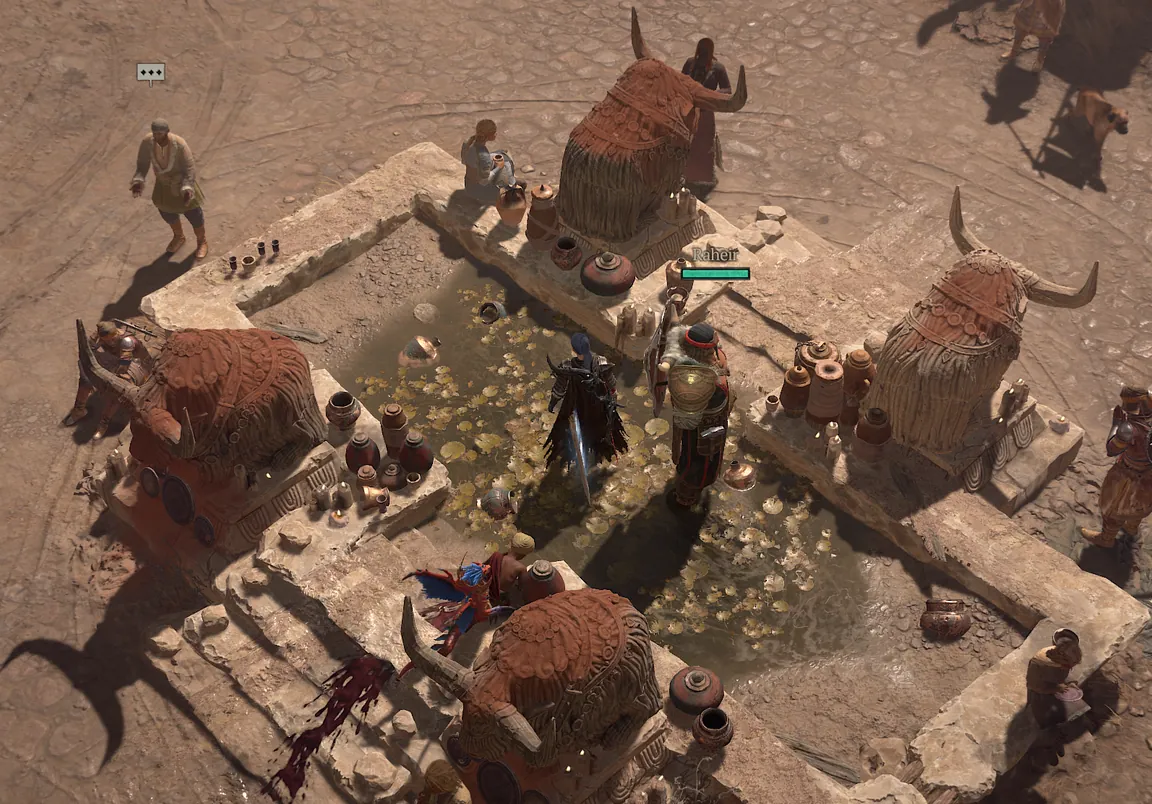
- With all three relics, go to the fountain in Ked Bardu in the Dry Steppes, the one with the ox statues.
- Drop each relic into the water and pick it back up.
- Use the Oxen God of the North, of the West and of the South. A flash of white light above each statue shows that the offering worked.
- Pick up the Strange Key. Don't lose it, because a lost key sends you back to the cow counter.
Open the Forlorn Hovel
Teleport to the Under the Fat Goose Inn waypoint in southeastern Scosglen and walk east to the wooden hut on the tip of the highlands. The key opens the Forlorn Hovel cellar for good on this character. Kill every cow inside, and the last one gives you the Stamina Potion. You can reset the cellar to farm more potions and hand them to friends.
Part 2: the Rusted Bardiche (Nahantu)
Nahantu has its own three relics. Each has a scroll about a "Lord Uacax" near a waypoint that hints at the task. Read it first, since it's part of the chain.
Jabbering Gemstone: thank three graves
- Read The Reverence of Lord Uacax at the broken dock in the Kurast Docks.
- Walk to the graves south of the docks. Along the northeast wall stand several graves.
- Stand as close as you can to the big grave in the middle and use the Thanks emote. Repeat at the grave directly to its left, then at the one directly to its right.
- The Jabbering Gemstone drops after the third. Three emotes at one grave don't count.
Rusted Old Bell: follow the morning birds
Read The Accession of Lord Uacax at the east entrance of Samuk. Then visit 12 bird statues in a fixed order and finish back at the first one. At each statue, get off your mount and walk right up to it, or the game may not count the visit. The order below follows the community route:
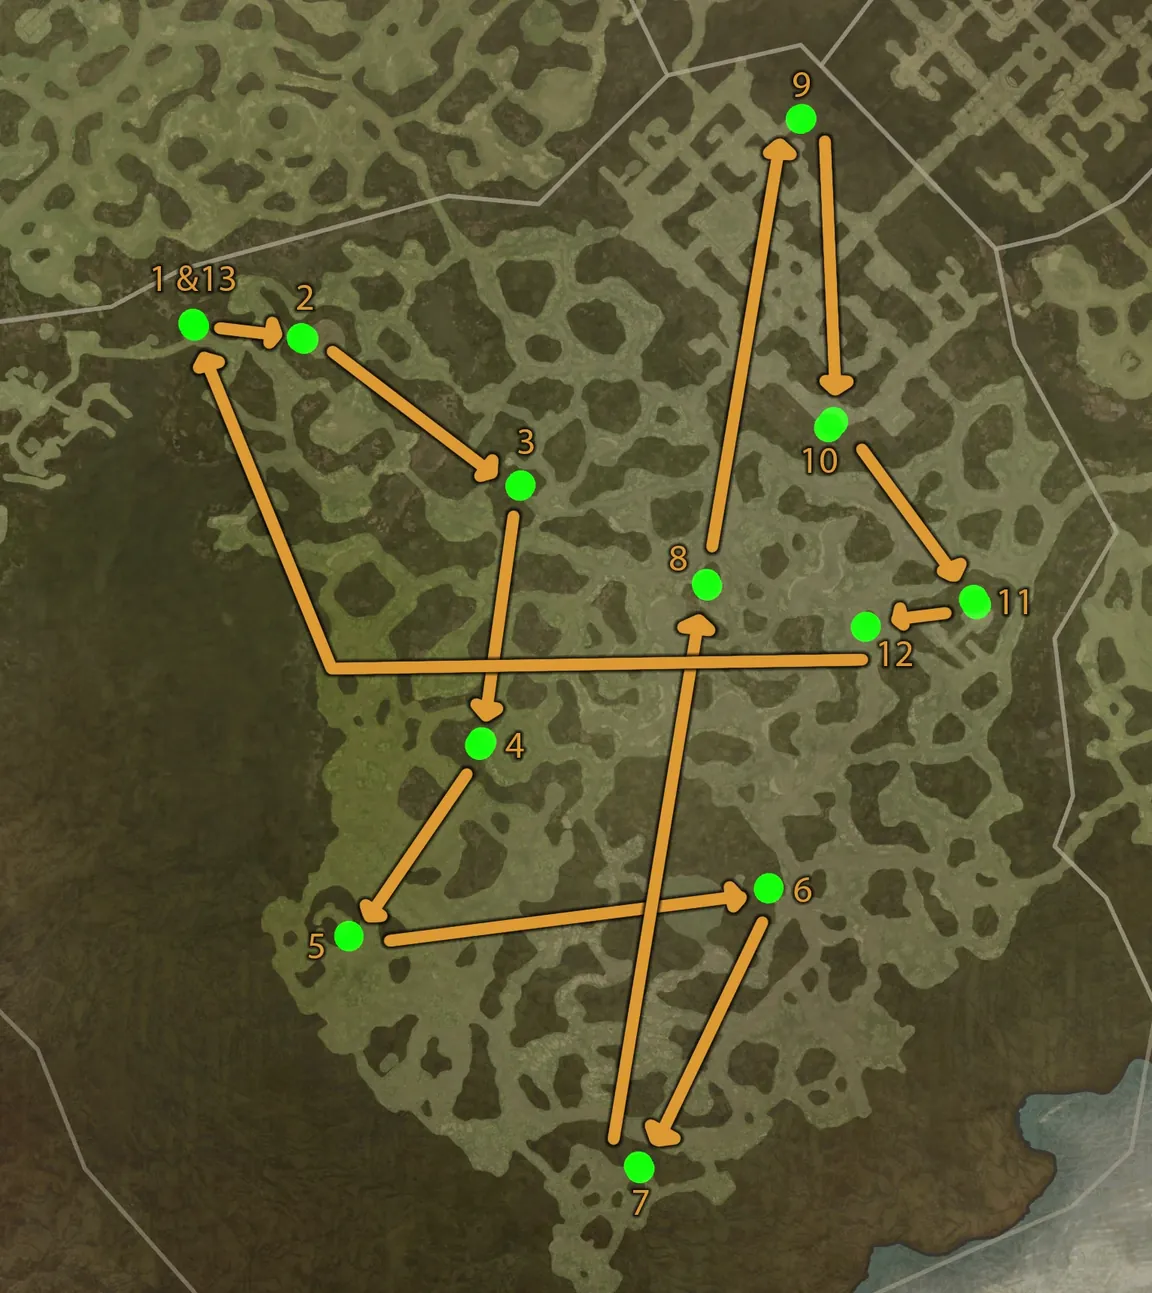
- Just outside Samuk, where the scroll is.
- Inside Sutsarin Grove.
- In an alcove in the Tangles.
- By a cliff in the west of Nin-Obisu.
- On a cliff in the southwest of Reflection's Edge.
- On top of the traversal point in Dreads Hollow.
- In the small camp by the Yeyahah Trying Grounds.
- Northeast of the Tenet of Akarat in the Vale of the Long Mists.
- In Lower Kurast, close to the Memory of the Dead.
- On a building in the southern corner of Lower Kurast.
- Near the shrine on top of the Putrescent Larder.
- On a small building in the Vale of the Long Mists, west of number 11.
Walk back to the first statue, and the Rusted Old Bell drops. Several statues stand on cliffs, rooftops or in alcoves, so look up and around at each landmark before you move on. If the bell doesn't show up, the usual cause is a skipped statue or two statues in the wrong order, so start the loop again from Samuk.
Crooked Staff: beat Blood Lightning with the basic attack
Read The Triumph of Lord Uacax in Kichuk in northeastern Nahantu. Southwest of the town roams Blood Lightning, an elite Lacuni. He drops the staff only if nothing but the default Attack damages him:
- Refund every skill point. Guides say that with an empty tree your primary button switches to Attack.
- Take off everything that adds skill ranks, Talisman seals and charms included. Players say these are the ones people forget.
- Dismiss your mercenary and drop thorns, minions and any passive damage.
- Switch to Normal, teleport to the Ichorfall waypoint south of him and kill him.
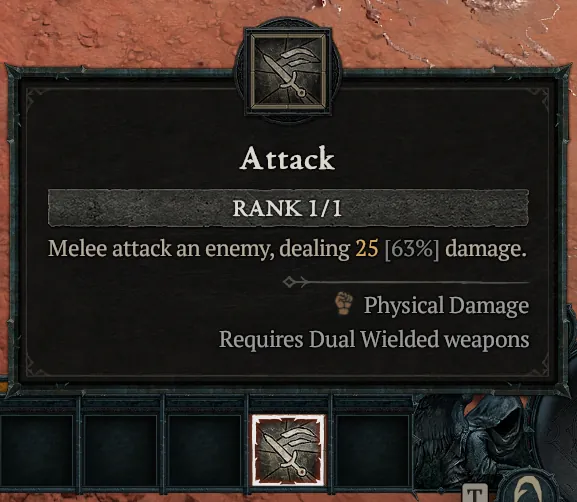
A new character skips the refund problem: it has no points to undo, and the staff goes to your main through the shared stash. For most classes a full refund is still the first thing to try. Paladins and Warlocks can't clear their class bonuses, according to one guide, and a Warlock player who reset everything still had no Attack, then got the staff on a new Barbarian.
Corrupt the relics with Cordycepic Zombies
- From the Ichorfall waypoint, go north to the Field of Giants. Three Cordycepic Zombies roam there.
- Clear the other monsters first. Turn off minions, thorns and other passive damage, because all three zombies must stay alive until they stand together.
- Pull the three zombies to you, stay put and kill all three at the same moment with an area skill. They leave black mushrooms behind.
- Without moving, drop all three relics on the mushrooms. A purple smoke shows they're corrupted, though low graphics settings can hide it. Pick them up again.
If one zombie dies alone, guides say it respawns straight away, so pull them again. A friend can help by gathering them while you wait in the middle.
Unusual Key and the Forlorn Burrow
Take the corrupted relics to the Oka'bo Temple, which lies south of the Kurast Bazaar. Each of the three braziers by its entrance takes one relic. The Unusual Key drops. Now enter the Forlorn Burrow cellar west of the Kurast Bazaar. With the key, a hidden opening shows up in the wall. Use it, jump into the secret room, kill all the cows and loot the Rusted Bardiche. This cellar resets too, so you can farm extra bardiches.
Part 3: Neyrelle's Hand (Skovos)
The third part runs on the Holy Cedar Tablets outside Kyovashad. The sin you carve there decides which chapter is active, so you travel between the Fractured Peaks and Skovos a lot. Three sins give you three relics, and the fourth sin turns the key into Neyrelle's Hand.
- Teleport to Fool's Quarry on Skartara and read the Outcast's Journal in the small temple to the north. It starts the chain.
- From then on, after every change of sin, go back and read the journal again. The guides say it updates the hidden quest state. For Pride it's required, and for the others it rules out a stuck step.
- Guides don't agree on the order of the first three sins, and none of them seems to depend on another. Only Greed has to come last, because it needs the key the other three give you. We use Pride, Anger, Fear.
Pride: Father's Chains
- At the tablets, pick Inscribe "Pride" into the wood, then read the journal on Skartara.
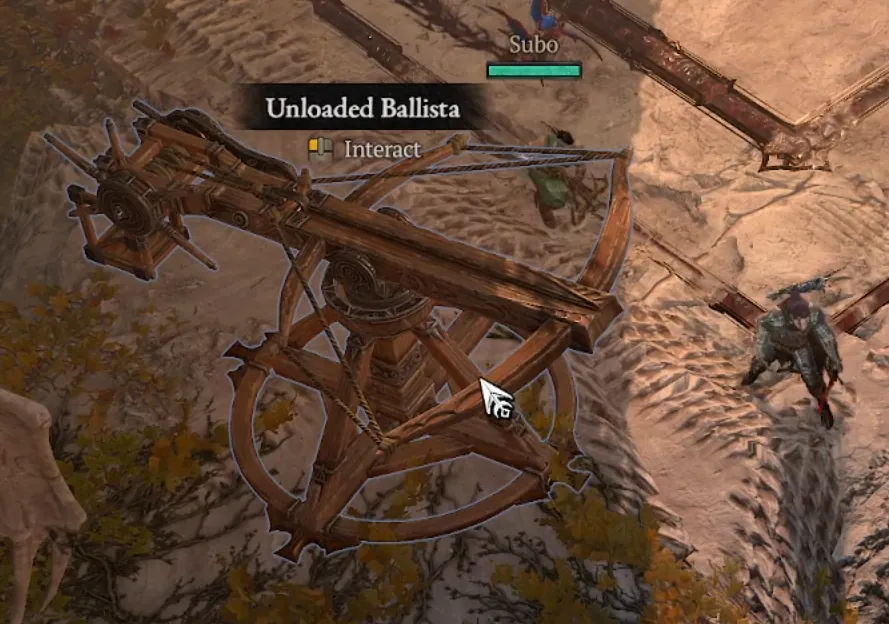
- Destroy ballistae around the observatory in the north of Celestia until an Amazonian Bolt drops. With the journal read, the first one should give it. It's a common item, so check your filter.
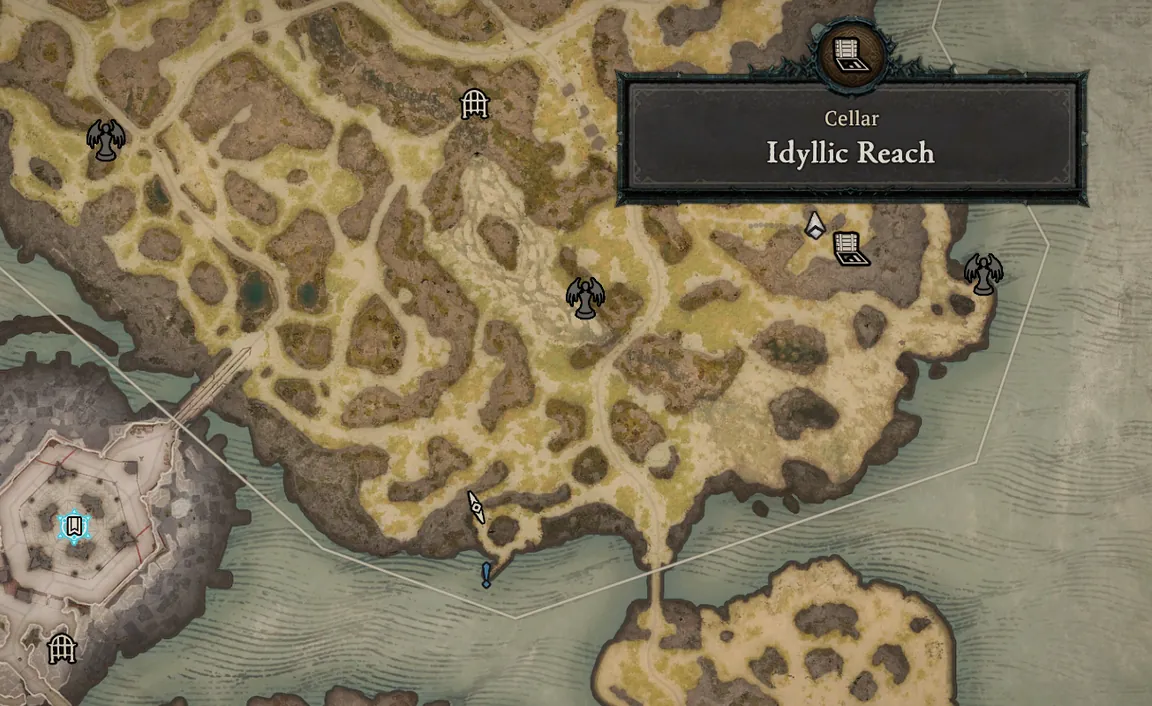
- Enter the Idyllic Reach cellar in the southeast of Philios, east of Temis. Use the Unloaded Ballista right at the entrance, and the bolt shoots a rope across the gap. Climb over.
- At the end of the hidden path, use the statue of the Heavenly Father. N'Facl, Jailer of Angels appears. Kill him and loot Father's Chains.
- Burn the chains at Antia's Flame, the signal brazier in the north of Philios.
Anger: Mother's Rose
- Pick Anger at the tablets and read the journal.
- In Temis, head to the Training Grounds and hit the Training Dummy until the Amazon Training Helm drops. The number of hits is random. The dummy in Kyovashad doesn't work for this, and one guide had the best luck with several Normal dummies at once. Put the helm on.
- Kill Corrupted Amazons around the observatory in northern Celestia. They drop the Tunic, Pants, Gloves and Boots one at a time. Equip each piece as soon as it drops, until you wear all five.
- In the full set, kill the nearby elite Vasha the Unbroken. She drops Mother's Rose.
- From the Athulua Garrison waypoint, walk north to the Temple of Courage and burn the rose at its signal brazier.
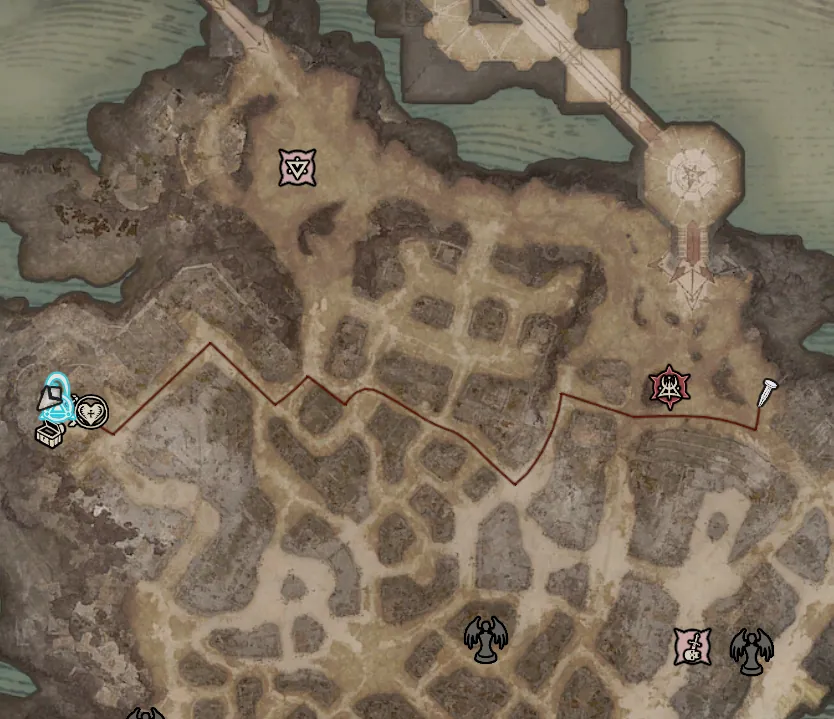
This is the step with the most luck in it. If Vasha keeps dropping nothing although you wear all five pieces, see troubleshooting below.
Fear: Hierophant's Skull
- Pick Fear at the tablets and read the journal. Dismiss your mercenary.
- On Lycander, ride to the Ruins of Broken Reason, west of the Temple of Life waypoint. Once you've cleared the Xanderos stronghold, its waypoint is closer. Don't fight anything nearby.
- Use the Large Crow by the fountain and follow it on your mount. It flies a fixed loop and circles some spots a few times before moving on. Stay close, and don't run ahead of it.
- Players say the climbs near the end are where people lose it: the first climb bends right toward a statue, the next two go up and to the left.
- When it lands back at its start, it leaves the Hierophant's Skull.
- Burn the skull at the signal brazier of the Temple of Life, south of its waypoint.
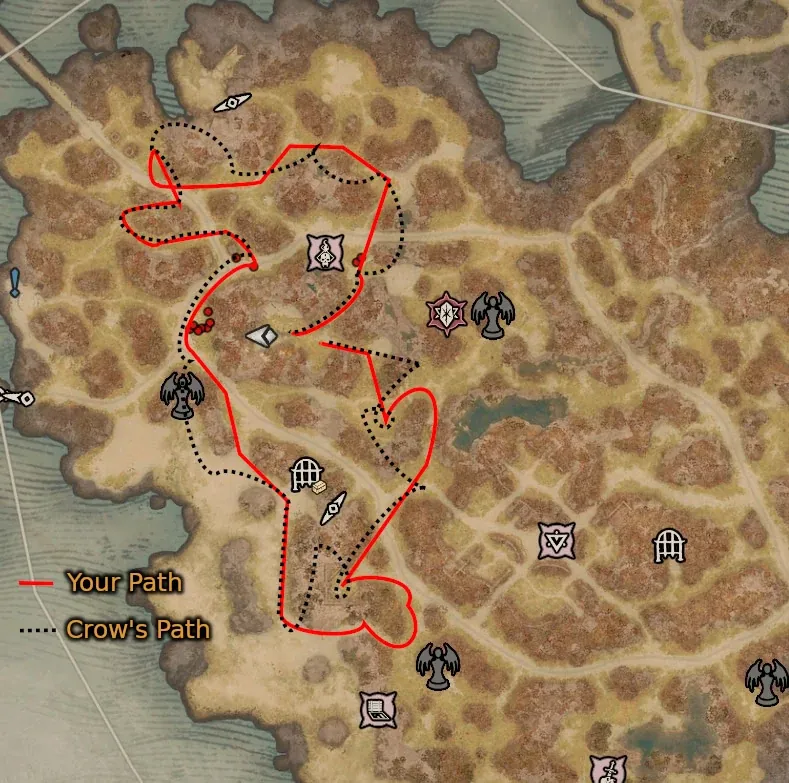
Lost the crow? Check its starting spot first, because the skull may already lie there. If not, it comes back for another try, or you log out, switch the difficulty and return.
The Hadopelagic Key
The key drops from the brazier when you burn the third of the three relics, whichever that is. One guide ties it to the skull only because that guide does the skull last. If you burned all three and got no key, check whether one of them was done on another character. That was the cause in one player's report: see troubleshooting.
Greed: Neyrelle's Hand
- With the key in your bag, pick Greed at the tablets and read the journal.
- Teleport to Backwater in Hawezar and follow the path northeast toward the Temple of the Deathspeaker, to the very end of the planks by the old shipwreck, the Creaking Hulls. You know the spot from the campaign: it's where you first entered the temple.
- Stand on the lighter wood at the tip and fish. Fishing anywhere else gives normal catches. A Locked Wooden Coffin comes up.
- Use the coffin once to open it with the key, then again to go inside.
- Walk to the end of the temple and use the Bloated Calf. It gives you Neyrelle's Hand.
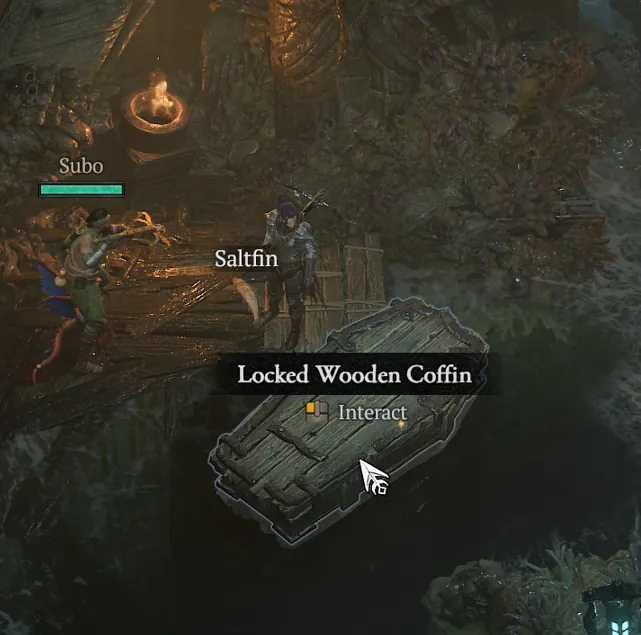
Neyrelle's Hand can't be traded, so every player gets their own. According to one guide, players you invite into the temple can also take a Hand at the end, whatever their own progress.
The Horadric Cube: Trophy of the Faithful
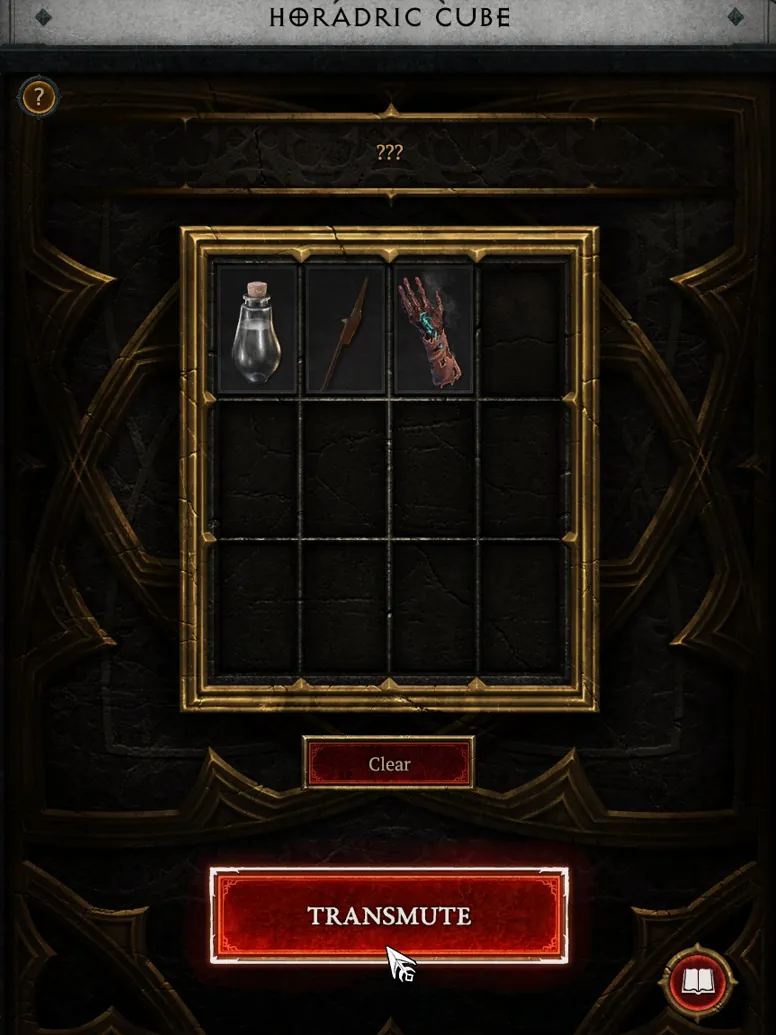
Put the Stamina Potion, the Rusted Bardiche and Neyrelle's Hand into the Horadric Cube in Temis. The recipe shows only question marks. Transmute it and you get the Trophy of the Faithful. Open it for the Torn Page. Opening it also unlocks the "There Is No Cow Level" achievement, the Moo title and the Moo emote. Keep the Torn Page in your bags, because you need it for the boat.
First entry: the boat to Scylara and the Tuesday ritual
- Go to Zerae's Shore on the east coast of Philios. Only the bearer of the Torn Page can see the Outcast's Boat there. Use it and watch the voyage to the island of Scylara.
- Enter the cellar on the island. Inside are a Fresh Milk healing well, a room called the Waiting Room and, to the north, a ring of 12 cows around a rune.
- On any day but Tuesday, the cows can't be killed. The book Gonnagal's Guide to the Hecatomb in the side room to the northeast hints at the day with a small weekly calendar.
- On a Tuesday, pick Greed at the tablets once more to be safe, sail back with the Torn Page and kill the 12 cows. Once they die, a golden portal into the Cow Level opens.
Which clock counts as Tuesday is not confirmed. One guide says your regional time zone, another reads the calendar hint as a week that starts on Sunday, and Blizzard hasn't said. If the cows still can't be killed early on a Tuesday, try again later that day. The Moo shortcut works on any day.
While you're on Scylara, fish in the rainbow pool next to the horse skeleton by the dock for the Vivid Whimsy, a mythic fish. It's a nod to Whimsyshire from Diablo III. Season 15 also brought Whimsyshire itself back, and our Whimsyshire guide shows how to get there.
After the first time: repeat runs and sharing
You don't have to wait for Tuesdays after your first run. Pick Moo at the Holy Cedar Tablets, and the always-open portal on Skartara by the Outcast's Journal is yours too, without the boat and the Torn Page. From inside the Cow Level, Leave Dungeon in the emote wheel takes you to Scylara if you want to fish there.
To share access, pick Moo at the tablets yourself and use the Moo emote right next to your friend there. They choose Moo at the same tablets and get the Skartara portal, but not your rewards.
New characters: the Outcast's Travel Pouch
Since Season 15, a vendor named Squirt in Temis sells the Outcast's Travel Pouch. Guides say you craft it once in the Horadric Cube from the Torn Page and three Rusty Cow Bells, which you get from fishing. After that you can buy pouches from Squirt. One guide gives the price as 10,666,666 Gold. You can farm that yourself or top up your purse with Diablo 4 Gold from our shop. A pouch holds a Stamina Potion, a Rusted Bardiche and Neyrelle's Hand, so a new character goes straight to the Cube. The bardiche counts as a white weapon, so check the filter when you open it. We haven't checked whether every detail of the pouch still holds in patch 3.2.3, so treat it as a likely shortcut.
Cow quest stuck? Troubleshooting
Start with the basics for every problem: is the right sin carved, did you read the Outcast's Journal after the change, are you on the same character as for the earlier steps, and does your loot filter show white items? Then look up your symptom:
| Symptom | What to check | What players report |
|---|---|---|
| No relic after 666 cows | Loot filter, and whether someone else picked it up | Relics drop on the ground as common items, so a filter hides them and nearby players can loot them. |
| No Attack button for Blood Lightning | All points refunded? Any item, seal or charm with +skill ranks left? | Players advise an empty tree and no +rank sources at all. In the forum thread where it finally worked, it isn't clear which change did it. Paladins and Warlocks reportedly can't get there, and one Warlock player got past it with a new character of another class. |
| Blood Lightning dies, but no Crooked Staff | Did anything besides Attack hit him? Mercenary, thorns, a group member? | A Rogue who put one point into a basic skill could kill him but got no staff. A new character is the cleanest test. |
| Relics show no purple smoke | Did all three zombies die at once, and did you stay on the spot? | Low graphics settings can hide the smoke. If the braziers at the Oka'bo Temple take the relics, they were corrupted. |
| No Amazonian Bolt | Pride carved and journal read again? | For Pride the journal is required, and the bolt is a common item. |
| No Mother's Rose from Vasha | All five pieces equipped, picked up as they dropped, Anger carved, mercenary off | One player got the rose on Normal after setting every slot to show the default look, dropping the five pieces and putting them back on in order (helm, tunic, pants, gloves, boots), then killing Vasha alone. The same player calls parts of it superstition, so treat it as a last try, not a rule. |
| The crow got away | Did you run ahead of it, or attack something? | Look for the skull at the start point. If it isn't there, log out, switch the difficulty and try again. |
| All three Skovos relics burned, but no Hadopelagic Key | Were all three done on this character? | One player had done the rose on an alt. After farming and burning the rose again on the same character, the key dropped right away. |
| Fishing brings no coffin | Greed carved, key in your bag, standing on the lighter planks at the very tip | Guides say one step off the right spot gives normal fish. |
| The cows in the Scylara cellar can't be hurt | Is it Tuesday? Greed picked again, Torn Page in your bags? | The exact start of Tuesday isn't confirmed, so try later in the day, or use the Moo shortcut. |
All of these fixes come from single player reports, not from Blizzard. Please don't delete items or restart the whole chain because of one stuck step. In most of the reports above, what helped was repeating that one step, on the right character.
Inside the Secret Cow Level
Behind the portal wait herds of Tormented Bovines. Kill enough of them and the Cow King appears, a lightning-enchanted elite like his Diablo II ancestor. He drops The Cow King's Crown, a Mythic helm with deliberately silly weekday bonuses, plus a few Prime Ribs. The crown is more a trophy and a look than a real upgrade. The Ribs are what most players come back for, because five of them summon Moophisto, the cow god of Season 15: our Moophisto guide covers the summon and his loot. Players also found the leg piece of the cosmetic cow armor on the Cow King.
Our plan for the Cow Level
- Only want the Cow King or Prime Ribs? Ask a friend or your clan for the Moo shortcut and skip the rest.
- Want the achievement? Ask around for a spare Stamina Potion and Rusted Bardiche first. You still need your own Neyrelle's Hand, because it can't be traded.
- Doing it all yourself? Set the filter, dismiss the mercenary, and do Skovos on one character. If a refund doesn't bring back Attack for Blood Lightning, or you play a Paladin or Warlock, use a fresh character for that step.
- Finish on a Tuesday, then carve Moo and open the shortcut for your friends. They get into the Cow Level, not your emote or achievement.
More guides and all Diablo 4 boosts are on our Diablo 4 page.
FAQ
Yes. The Secret Cow Level is a hidden area full of cows with the Cow King at its end. You open it with a long quest chain or with the Moo shortcut from a friend who finished it. It isn't Whimsyshire, the rainbow level you reach with a Liquid Rainbow.
The fast way: a player who finished the cow quest uses the Moo emote next to you at the Holy Cedar Tablets outside Kyovashad, you carve "Moo" into the wood and use the portal by the Outcast's Journal north of Fool's Quarry on Skartara. The long way is the full quest, which ends with a portal in the cellar on Scylara on a Tuesday.
No. The shortcut only opens the portal for you. The "There Is No Cow Level" achievement, the Moo title and your own Moo emote come from the Trophy of the Faithful, which you only get from the full quest.
The Stamina Potion from the base-game cow chain, the Rusted Bardiche from Nahantu and Neyrelle's Hand from Skovos. Transmute them in the Horadric Cube in Temis to get the Trophy of the Faithful.
Only the first way in through the cellar on Scylara needs a Tuesday. Guides don't agree on when that day starts, and Blizzard hasn't said. Once you carve Moo at the Holy Cedar Tablets, the portal on Skartara works every day.
Players advise refunding every skill point and removing every item, seal and charm with +skill ranks; guides say the primary button then turns into Attack. In the forum thread where it finally worked, it isn't clear which change did it. Paladins and Warlocks reportedly can't get there at all. One Warlock player got the Crooked Staff on a new Barbarian and passed it on through the stash.
The key drops after you burn the third of the three Skovos relics. Do all three on the same character: a player who had done Mother's Rose on an alt got the key after redoing the rose on the character that burned the other two.
Yes. Both can be traded and stored, and their cellars can be reset to farm more. Neyrelle's Hand can't be traded, so you still need your own, usually through the Skovos part. One guide says that a player invited into the temple at the end of the Greed step can take a Hand there too, whatever their own progress.
Kill enough Tormented Bovines and the Cow King appears. He drops The Cow King's Crown, a Mythic helm with joke bonuses, and a few Prime Ribs. Five Prime Ribs summon Moophisto in the Bovine Sanctum.
Change Log
- 25.10.2026 - Secret Cow Level guide published. Steps compared across community guides, names taken from the game text of patch 3.2.3, on October 25, 2026.
- 25.10.2026 - Added maps and screenshots from community guides for the shortcut, the relic spots and the routes.